Gimp for Authors – Basic Tips I Wish I knew When I Started
Gimp is a free graphics program and it's fairly easy to use. But a lot of the program is not self-explanatory. So you can get lost really easily. A graphics designer needs to know how the entire program works. For authors, writers and other self-publishers, you only need to know a few of the tools to do pretty much everything you need to do.
The purpose of this blog post and video below is to give an overview of what authors will need to know about Gimp in order to be able to make social media posts, ad banners and book covers.
OPEN A NEW DOCUMENT VS. OPEN AS A LAYER:
Once you download the software, you will open the program and your first move will be to 'create a new image'. Click on FILE > NEW IMAGE. This will open a new dialogue box. Fill in the dimensions of how big or small you want the image to be.
PPI - This controls how big the image is. If you are creating something for a printer, or a paperback cover, you need to fill in 300ppi. If you are creating a social media image, fill in 72ppi. Printers need BIG pictures and the internet likes smaller pictures because they are easier to pull up from the servers.
HOW THE LAYERS PANEL WORKS:
All images are created in layers. The layers are built up one over the other. This is another reason why transparency is important -- which I'll cover below -- because you don't want to cover up the image or work below the layer you are on.
If you don't see your layer's panel open with the default settings, click on Windows > Dockable Dialogue Boxes and Layers will be one of the first choices in the long list of choices. You can get to it by using the shortcut key Control L.
CHANGING COLORS FOR TEXT:
The graphic to the left is a closeup of the tools panel. Each tool is represented by an icon. Below the tools is a graphic representation of your foreground color (the color on top) and the background color (the color in the back).
When you open a blank layer, it will default to your chosen background color.
The text tool uses the foreground color. So if you want to create a layer of black text, click on the text tool, click where you want to type on your image, and the text will render in black.
However, if you want to change the color of your text, before you click on the text tool, click on the black foreground color icon, and a color box will open. Choose another color and then click okay. Then click on the text box and your text will render in that color.
TIPS ON USING THE TEXT TOOL:
The text took can be tricky for a beginner because you can't as easily use the shortcut keys. For example, if you change your text size and then click on M for the move tool, it only adds an 'm' next to the text size. This can drive a new user mad! So be aware of this, that the shortcut keys can be a bit tricky when using the text tool.
It's best to click out of the text box and then click on the move tool icon. I wish I had known this when I first started using Gimp!
USING THE ALIGNMENT TOOL:
In order to align everything in the center on your image, you will need to use the alignment tool. There are two steps in using the alignment tool. Most tools are as easy as just clicking once on them. However, when using the alignment tool, click the tool to make it active. Double click to bring up the tool box. Then choose to associate this to the background layer. Once it has been assigned, then you click inside the image to the area you want to align. Four very tiny dots will surround the object you are about to align. These tiny dots are easy for a beginner to overlook. Once you see these tiny dots, then you click on the 'center' or 'left-align', etc. inside the tool itself.
When you see the video below, you will see it in action and it will become clearer.
SAVE VS. SAVE AS VS. EXPORT AS:
There are three ways to save documents. I'll post below the three ways and when you want to use that particular save:
Save or Save as - This saves the image as a .xcf document. These documents are only recognized by the Gimp program itself. You may want to save a social media image you made as a .xcf document. This way, when you open it, you open the document and all the layers you created. You can easily reuse these files to make future social media images.
Export as - In order to use the images on the web or even send to a printer, they will need to be saved in the proper format. So you will save as a .jpg or .png for the web. If you have a job that a professional printer will use, you will most likely have to use a pdf.
SPECIAL INSTRUCTIONS ON SAVING FOR GIMP BEGINNERS:
It's important to know that .jpg images do not allow transparency. They will default to having a white background. .png images do allow transparency backgrounds. This means that if you have a round logo with no background, you need to save it as a pgn file. Otherwise, it will throw in a white background if you save it as a jpg.
Now, there is a little glitch in Gimp for saving PDF files, especially when saving book covers. The work around is to save the book cover as a xcf document for safekeeping. Then save it as a jpg file. Open the jpg file and then save that as a pdf.
If you just save the xcf file as a pdf, it starts throwing thing into different places. It took me hours and hours to figure this out, so I'm passing on this tip to other beginners! Save as a jpg, then open the jpg and save that one layer document as a pdf.
HOW THE TRANSPARENCY WORKS:
In the project below, the Banner for Bookfunnel, you won't really need to now about the transparency layers. But I offer this as a beginner tip.
If you choose to make an image and choose the transparency layer from the getgo, then each layer above your first layer will also be a transparency layer.
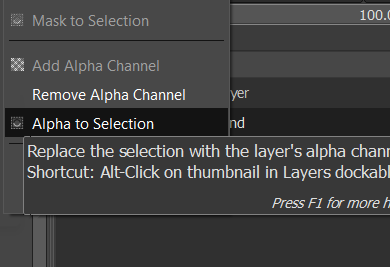
However, if you just open the document and try to add something that needs a transparency, it will cause a lot of frustration because the transparency won't work. If you do this, open with a white or black background, then go over to the layers panel, right click on the layer and select "add alpha channel". When you do this, nothing will happen, no noise is heard. It feels like nothing happened. But it did.
If you then click over into the image and then click your delete button ono your computer, the background color will disappear and in its place will be the grey and white checkerboard, as seen above, which represents the transparency.
For your convenience, I have posted the time stamps for the how to video that follows in case you want to watch a short clip more than once.
Video Timestamps:
00:01 - How to properly size a graphic 01:19 - How to open a picture vs. how to open a picture as a layer 02:00 - How to resize an image with the scale tool 03:15 - The layer's panel - How to find it - how it works 04:00 - How to change text color with the eye dropper 04:33 - How to use the text tool, a text box, and create a headline (T) 05:02 - How to resize the text size and make two text lines 06:02 - How to use the alignment tool (Q) 07:00 - How to move the text box (M) 07:21 - How to save the graphic as a XCF document (Gimp document) 07:58 - How to export the graphic as jpg/png graphic for internet 08:30 - How to save your project as a Template and reuse it 09:36 - How to turn a black background layer into a transparency layer

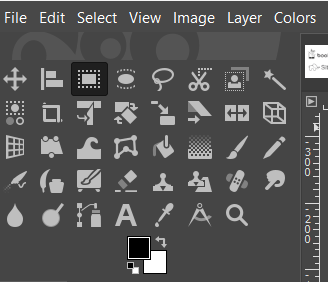 The graphic to the left is a closeup of the tools panel. Each tool is represented by an icon. Below the tools is a graphic representation of your foreground color (the color on top) and the background color (the color in the back).