DIY book covers – Read First Chapter.com

How to Create a 3D Book Series Book Cover

This blog post is done to accompany the video that is posted below.  This will give you the instructions that may be helpful to keep open as you create your own 3D Book Series Bundle Cover like the one on the left.

These instructions will allow you to make any size bundle cover, going in any direction.

At the end of the video, I will also give you instructions to make the thumb cut or the finger pull that is popular on book series as well.

WHAT YOU WILL NEED:

  • A high resolution front cover copy of your book, or whatever other copy you want to represent the book series
  • Gimp photo editing program which is free, or photoshop.  If you use Canva, I will assume you can translate all the steps in that program.
  • A high resolution picture of whatever you want to be the background behind your books spines.
  • Any emblem or other branding graphics that you may want to put on the covers.  In the cover that I make in the video, I use a police badge graphic to brand the series as a police procedural.
  • You will need a large rectangle image with a transparent background in order to work.  Make sure you are also working in 300dpi or 300ppi, whatever the resolution is referred to in your program.

LET'S MAKE THE 3D BORDER DIAGRAM:

In gimp, the first thing we will do is open a document that is 2500 pixels wide and 1,000 pixels high.  This will make sure you have lots of room to work.

The next step is to bring in a 3D bundle model cover that you found on Amazon, like the picture on the above left.

Next, draw lines around the cover so that you create this shape.  Our final cover will be transformed into this final shape by using the perspective tool.  The example of this is above right.

LET'S CREATE THE COVER AND THE BOOK SPINES:

Open a new document that is 2082 x 1000 pixels and 300 dpi. This will turn out to be too large, but better too large than to run out of room.    This will give me a good platform to make the book series mockup.

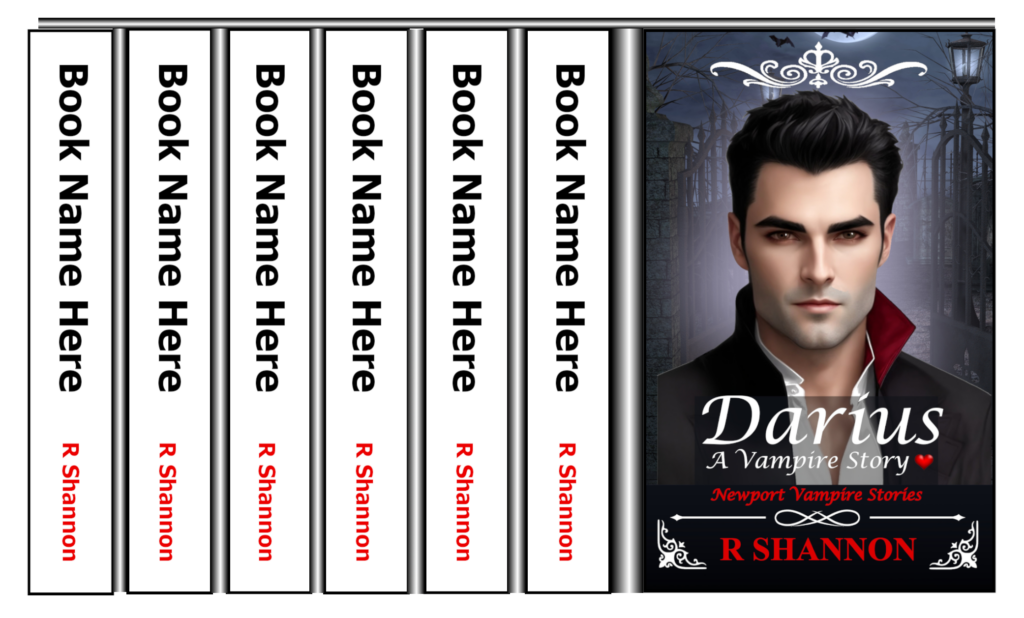
Bring in your ebook cover and place on the right side of the space.  Leave a space between all the books spines and the cover.  Add the titles and the author name.

My best tip is to start with the book title that is the longest.  This way, you will choose the right size font to use.  You will also need a picture to put on the background of the book spines.  You can either add a color wash layer or fiddle with the opacity to make sure you can read the book titles.

Created with GIMP

Once this is done, you will then want to add a 5 pixel line between the books and then on that same layer, add a filter, gaussian blur and blur it out until it looks like a slight bend between books.

The final step is to choose a light color and dark color from your front cover.  The create a gradient in the space between the front and back.  Anyone with digital graphics skills will be able to put this together with just these few instructions and pictures.  However, if you are new to graphic design, just watch the video below where I demonstrate how to make it using gimp, which is a free program.

The video below will be available when it is posted:

https://youtu.be/uU0xM48Cou4


How to Create a Hi-res Paperback Cover from a low-res eBook Cover

HOW TO CREATE A PAPERBACK COVER FROM AN EBOOK COVER

I just finished a how-to create a paperback book manuscript from an eBook manuscript so I thought I would make a sister video showing how to make a full high resolution paperback book cover from a low-resolution eBook cover.

The focus of the video is on the creation of the book cover, so I won't be going into too much detail on how Gimp works.  However, I pepper the tutorial with some of the keyboard shortcuts or the names of the tools I am using.  This should make it easy for Gimp beginners or others who like to work in Canva.

However, I do have a playlist on my YouTube channel teaching new writers ow to use Gimp, which is a free photo manipulation tool and you can use it to create book covers and other book marketing graphics.

WHAT IF I ONLY HAVE A LOW-RESOLUTION?

If you only have a low resolution, you can upscale it for free at the this website:   Upscale.media

This will make sure you have a high resolution image before you begin. 

YOU WILL ALSO NEED A PROPERLY-SIZED TEMPLATE:

Each paperback cover will need it's own customized book cover template.  The reason for this is because the number of pages of the book determines the spine width and that controls how wide the paperback cover needs to be.

KDP has a paperback calculator on it's website, and if you've never used it before, I do demonstrate it in the video on this subject below.

NEXT – YOU WILL NEED A PROPER PAGE COUNT:

Here is a picture of the last page of my Betrayal Paperback from my last video.  It shows two different page counts.  The top one is what will be printed on the last page of the book.  However, this leaves out the front-pages that use roman numerals and it also includes all of the skipped pages in the document.  This is not the correct page number for a book cover.

Below on the left hand side, you can see another page count that is shown at the bottom of the actual Microsoft Word manuscript.  This is how many actual pages are in this document.  This is the page count you will need to run the Paperback calculator and get a proper sized paperback template.

Write down the proper page number before you go to the KDP calculator and run the template.  You will need to click through the questions and choose your answers, including the size of paperback you will use.  I use a 5.06 x 7.81 and demonstrate this choice in the video below if you want to see it done.  Otherwise, you can go straight to the KDP calculator here.

NEWBIE TIP ON BRANDING BOOKS IN GENERAL:

Above is a graphic panel showing you four back-cover examples that I pulled form Amazon this morning by searching for paperbacks in the vampire genre.  I also pulled two other back covers just for comparison.  You may want to think about what type and style of back cover you  want to create before starting.  You will follow the same procedure I've demonstrated in the video below, but you may choose another style for your book.

The book featured in my video is Betrayal and this is my 14th published book and it's the 6th book in my Newport Vampire Stories Series.  So the branding for this series is already established.  While I create my Paperback cover from the eBook cover, I will show you how to follow a style template as I work.

Once you choose a style for the back cover of your own, you can bring in that photograph and use it in the same way I use my series book template.

Because my style is already established, I have a list of everything that I will need from the cover, including the layout, all the color numbers, the font names and sizes, and even the size of the font I will use in the spine of the book.

QUICK SUJMMARY OF THE VIDEO:

If you are not a newbie and have no need to see it done, I will just summarize what I do in the video:

I bring in the series paperback template as a 'style template' and add guidelines to the downloaded KDP calculator paperback template.

I pull in and align the ebook cover between the guidelines.

I then pull in the back cover picture and align it accordingly.

Then one by one, I start at the top and create each text layer after another, using the series style template along with the customized margins from the paperback template.

Then using the text tool along with the rotate tool, I create the spine text and align in the center of the guidelines.

I save the finished paperback as an .xcf file so that it saves it as a gimp file with all of the layers in tact.

Then I export the same image as a .jpg file.

I then pull in that .jpg from the recent list and save the .jpg as a pdf.  Gimp had a glitch at one time going from an .xcf file straight to a .pdf.  So I just save the jpg first, which I will need anyway, and then I save the .pdf file.

That's everything in a nutshell.  I'll post the video below for anyone who wants to watch the cover being created in real time.