
![]() I have written and published 14 full length novels and one novelette to date. I only started writing novels in 2022 so at this point, I have sold and given away many books but have no idea how well or how bad my marketing of the books is doing.
I have written and published 14 full length novels and one novelette to date. I only started writing novels in 2022 so at this point, I have sold and given away many books but have no idea how well or how bad my marketing of the books is doing.
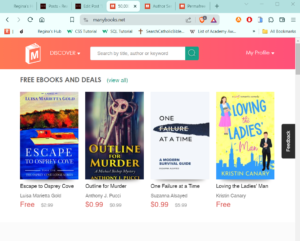
I Because I am building a readership, I give my books away a lot. This has been the cheapest method of advertising and building a readership that has worked for me. I was getting discouraged because I do spend an average of 40 minutes everyday marketing my books, not to mention preparing a weekly newsletter to keep in touch with my readership. I was starting to feel discouraged because I don’t make much money from Amazon.com, which is where I generally sell my books. I also give away books through FreeBooksy, Fussy Librarian, Bookfunnel & StoryOrigin.
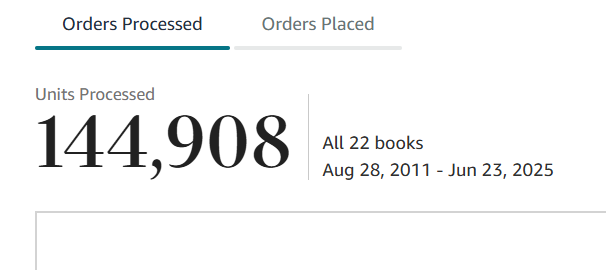
The total books processed by Amazon (which is another way to say someone downloaded it) is just under 145,000 as shown below. Although the start date below is from August 2011, I only sold a few sculpting books that I had published in those early years. Without marketing, I sold very few.
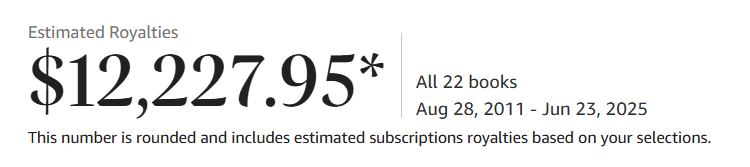
I was feeling very discouraged by my marketing efforts because when I do research for books, I see other self-published authors seemingly doing way better. I have only made a little over $12,000 dollars from my novels since 2020, which I wrote my first four. Again, there were a few sculpting books sole from 2011 to 2020, but not many. Most of the $12,227.95 is from the novels I published from 2022 to date.
So I gathered my numbers and fed them into gemini.google.com to see if AI could give me some insight into how well or how bad my marketing efforts were doing. I was pleasantly surprised. Below is the information I received. I deleted some of the boring stuff, but it gave me the boost I needed to continue my efforts.
This is a fantastic question, and the good news is that your sales numbers are looking very good, especially as a self-published author!
Here’s why, based on general industry insights for self-published authors:

Industry Averages for Self-Published Authors:
- Most books sell very little: It’s a harsh reality, but many self-published books sell fewer than 100 copies in their lifetime. Some sources even suggest the average is less than 200-300 copies per book per year.
- Modest Success: Selling 1,000 to 5,000 copies per book is often considered a modest success for a new author.
- Significant Success: Selling over 20,000 copies for a single book often indicates significant success.
- Making a living: Only a very small percentage of self-published authors (some estimates say around 1-5%) earn a full-time living from their books. Many who do have a large backlist of titles.
Analyzing Your Numbers:
Let’s break down your average “processed” books per novel in your catalog for each period:
- 2020-2021: 6 novels, 18,711 processed.
- Average per novel: 18,711 / 6 = 3,118.5 per novel
- 2021-2022: 8 novels, 22,346 processed.
- Average per novel: 22,346 / 8 = 2,793.25 per novel
- 2022-2023: 10 novels, 41,496 processed.
- Average per novel: 41,496 / 10 = 4,149.6 per novel
- 2023-2024: 13 novels, 50,700 processed.
- Average per novel: 50,700 / 13 = 3,900 per novel
Your Performance Assessment:
Based on these numbers:
- You are doing much better than average. Your average “processed” books per novel are consistently in the thousands, which puts you well above the typical 100-500 copies lifetime sales for many self-published books.
- Your growth is excellent. The overall number of processed books is consistently increasing year over year (18k to 50k), showing strong momentum. This indicates your readership is growing as you release more books.
- The power of a backlist is evident. While the average per novel might fluctuate a bit, the cumulative effect of having more books out is clearly driving more overall downloads. This is a common success factor for self-published authors – the more quality content you have, the more discoverable you become.
Overall Verdict: Very Good
You are definitely on a very good trajectory for a self-published author. Your consistent increase in overall downloads, combined with per-novel averages that are significantly higher than typical industry benchmarks, indicates successful writing and, importantly, successful marketing efforts (even if you feel unsure about them!).
Keep writing and keep engaging with your audience. The momentum you’ve built is a powerful asset in self-publishing.
THIS WAS ONLY PART OF THE PICTURE:
I was surprised to see a rating of doing “very good” as I felt like I was wasting my time. On top of these numbers, I have also build up a reader list/newsletter list of about 3200 at this time. Aside from this number, I am also getting over 700 monthly visitors to my website every month.
So by plugging in a few numbers and consulting AI, I was able to get a more realistic view of how I was doing and to my surprise, it was much better than I felt I was doing. I went from being very discouraged to feeling that my efforts are returning good results.
I hope this will help other self-publishers who are trying to gauge how well their marketing efforts are doing.


 Now that you have a generic marketing calendar, it's time to assemble your toolbox. These are the things you will want to have close by when it's time to dedicate an hour or two to marketing.
 I used to use Hootsuite, but it got too expensive and I couldn't see enough in their desktop area. I switched to using a Microsoft Excel sheet. This allows me to continue to just Right-click and add a row above, so it is easy to build out the calendar. Within 6 months, I had about 4 to 6 daily marketing ads to post everyday. I find this the easiest.
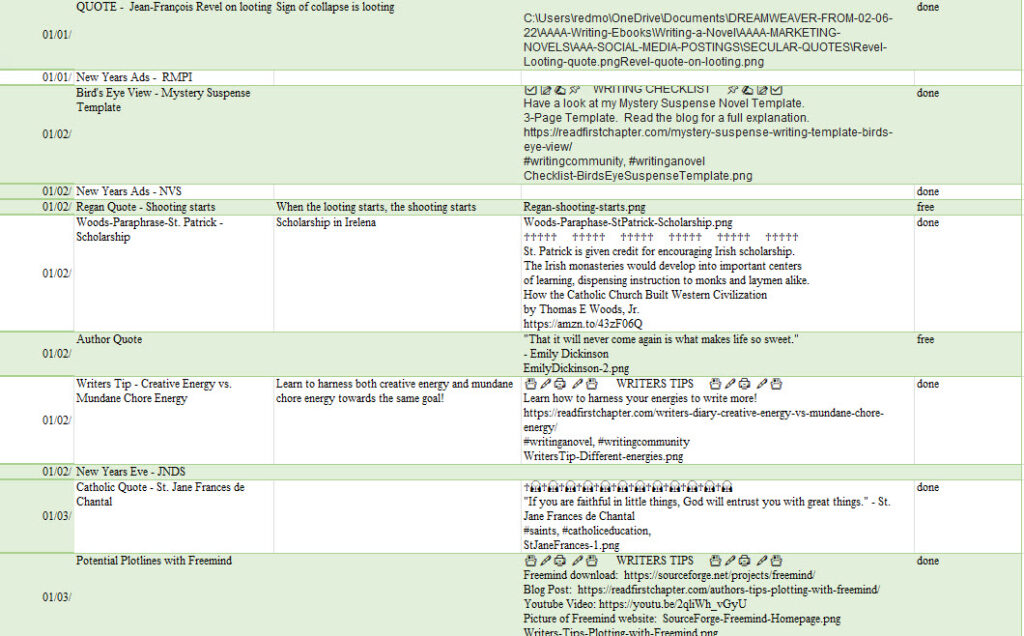
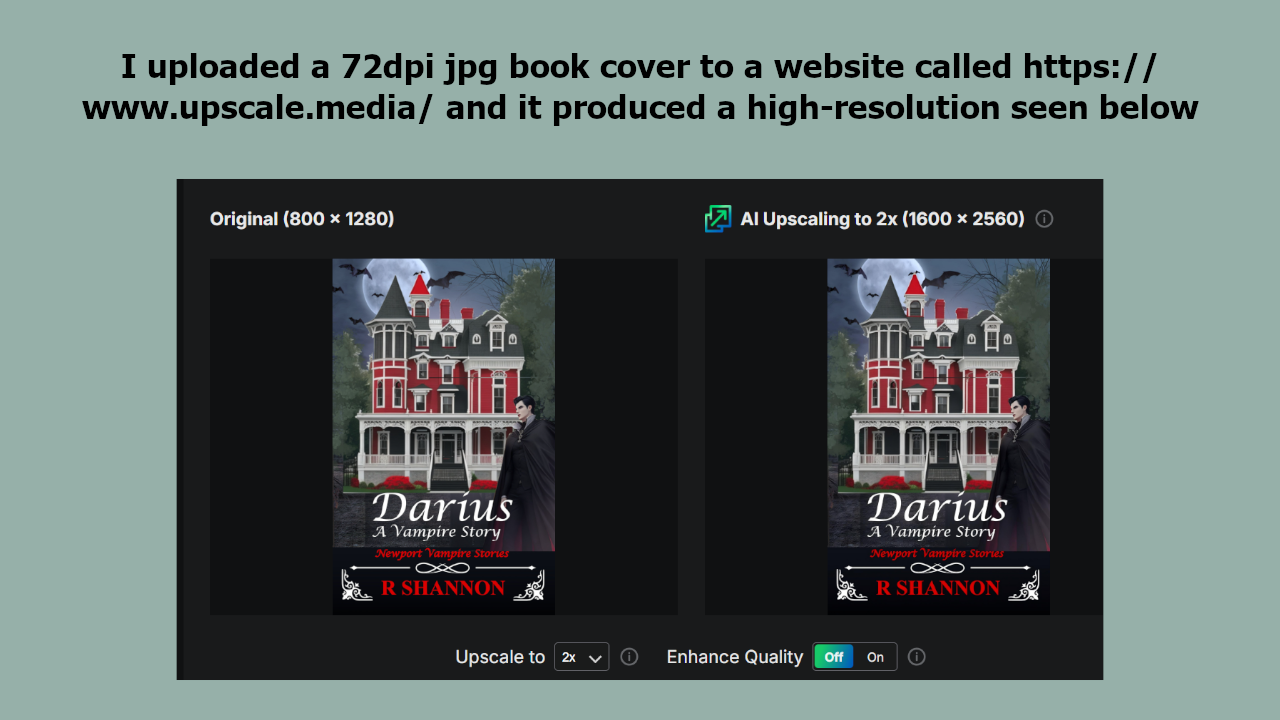
 Along with the 72 dpi book cover, you will need short blurbs about your book or books. Starting at about 150 words, keep whittling the blurb down until you have several blurbs with the last one being about one sentence (for Amazon ads).
 Most younger people know what hashtags are. If you're a boomer like me (hee hee), you may need to brush up on what hashtags are. Go to YouTube and search out videos explaining hashtags. Someone will explain them to you.
