Self-Publishing a Novel – Page 2 – Read First Chapter.com

Writers Tip – How to Do Advance Reader Copies

Is there anything worse than staring at an empty page and not knowing where to begin?  I don't think so.

When I was new, I liked the idea of offering an Advanced Reader Copy of my book.  It sounded so easy.  It is easy -- but, there is a lot of planning involved and you need the right verbiage to ask for a favor without putting your readers off 🙂

PLANNING IS THE KEY:

When I was new, I was so anxious to release my eBooks.  Now that I've been doing this for a few years, I realize that the planning behind a book is crucially important.  So my tip to newbies is to wait until you have the book back from the editor and the proofreaders.  Only then are you ready to release as an ARC Copy.

WHY THE DELAY?

The delay is for "reading time" and "pre-order time".  Both of these strategies will help you get reviews and drum up some buzz about your new book.  You don't want to miss out on posting about your book on social media with the following hashtags:  #comingsoon, #newrelease, #releasedate, #ARCreaders, #preorders, #freeebooks -- and more!

EIGHT WEEKS?

Explosion-8-weeksWhy eight weeks?  You need to gather readers for at least two to three weeks to send them the book.  They need at least two to three weeks to read the book.  That takes you to 6 weeks.  Now, if you are a beginner, I'm suggesting you plan your release eight weeks out.

If you will be using Bookfunnel or SiteOrigin to send out the book, you'll need time for people to find it as the authors all send around the newsletters about the promotion at a different time.

Now, if you have been writing and releasing books for awhile, you can probably get this all done within 6 weeks.  I'll leave it up to you to figure out how you want to do it.


UPLOAD YOUR BOOK TO AMAZON WITH A PRE-ORDER DATE.

Only set the eBook for pre-order.  I tried to set the paperback once, but that went live!  So only do the eBook.  Once you upload it, record your ASIN number.

Example-of-verbiage-bar

ADVANCE REVIEW COPY – VERBIAGE FOR AN INVITATION FOR ARC READERS:

Dear Readers:

I have finished BOOK TITLE.  This is Book 3 in BOOK SERIES NAME.

I'm sending this email to my newsletter subscribers to see if anyone is interested in getting a free copy of the book in exchange for agreeing to read the book before it is released.  The release date is RELEASE DATE.

Below is a description of the book to see if you would like to read it:

[Add in the description you plan to use at Amazon KDP.  Don’t let it be too long, maybe 4 medium paragraphs at the most]


ARC-ad-reading-cat

Above is an ad I used on Social Media and on my website when I was looking for ARC readers for Murder in the Car Wash.  I had over 25 people sign up.  For newbies, that's a lot.  Not for Steven King or Nora Roberts, but for new self-published authors?  It's a lot.


ADD CONTACT INFO:

In the ARC copy, I use a page called Note to Reader where I thank them for reading the book.  I add in a few words about liking to interact with my readers, and add my email in case any of them want to let me know what they thought about the book.

If anyone takes the time to email you and point out a typo or grammar mistake that got by the editor and proofreader, thank them.  I also add them to the Acknowledgement Page in the book!


THE RELEASE DATE HAS ARRIVED:

release-dateDuring the time you're waiting for your ARC readers to finish reading the book, find time to prepare your Paperback and Hardcover manuscripts.  This way, you can upload them on the day after your eBook release.

Why the day after?  I never trust things 100% -- a bit paranoid in today's world.  Maybe Amazon will have a website glitch, etc.  I want to make sure the book is released before I send the emails to my ARC readers or publish my Hardcovers or Paperbacks.

Example-of-verbiage-bar

WORDING FOR THE EMAIL INVITING READER TO DOWNLOAD AN ARC COPY:

Here is an example of wording to ask for a review:

Dear Advanced Copy Readers:

The day has finally arrived!  BOOK TITLE has launched on Amazon on RELEASE DATE.  I hope you all enjoyed the advanced copy of the book.  I would be so grateful if you would take the time to leave a review.  Here is a direct link: http://www.amazon.com/review/create-review?&asin=B0B3Y2WH9G.* (See below)

I'd like to take one final opportunity to thank you so much for participating in my launch team for this book.  A couple of you have gone the extra mile in sending an email pointing out a typo and grammatical error or two, which is invaluable.  The book was professionally proofread before the ARC release, but a few errors still got through the professionals, but my team found them!

I'm working on a new murder mystery series and also working on [new project if any].  I will surely contact you all when these books are ready to go in the hopes you will have the time to participate on another launch team!

DON'T FORGET TO PUT A LINK TO LEAVE A REVIEW IN YOUR FINAL MANUSCRIPT!

HOW TO CREATE A REVIEW LINK FROM AN ASIN NUMBER:

Below is the review link for my Car Wash book.  Each review link is created the same way.  Your link will be this link with your ASIN number.

Just copy this link starting from the http all the way to the asin=Then substitute your ASIN for my ASIN, as shown below:

http://www.amazon.com/review/create-review?&asin=YOURASINHERE

Book Formatting – Ebook, Paperback & Hardcover

3-Page-KDP-Formatting-Cheat-Sheet-Image

In this blog post I will explain how to go from an eBook template, to a Paperback Template and then to a Hardcover Template.  What is the benefit of this?  By doing it this way, you don't have to start over each time with a different template and redo all of your styles!

REMINDERS FOR ALL MANUSCRIPTS:

Be sure to remember to embed fonts into your documents.  Go to File > Options > Save > Scroll down until you see this section about Embedding the fonts.  Only check the first box.  This information is from KDP.

Embedding-fonts-example

LET'S START WITH THE EBOOK MARGINS

EBOOK COVER SIZE:  1600 X 2560 – 300 dpi
If you will be using a cover on the web, make a copy of your eBook cover at 72 dpi.  This will make your cover images faster to upload and download on the web.

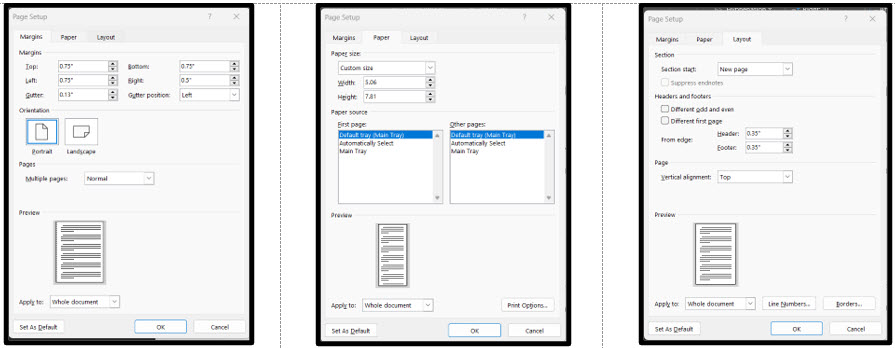
I use an 8.5 x 11 size paper but I have seen videos saying you can use the size of your paperback.  But I'm teaching people the way I do it.  To get to these settings, Click on the Layout Tab > Margins > Custom Margins.  Below is a picture of the settings that I start with.

This formatting has no gutter and the pages are completely centered.  That's why I use this formatting.
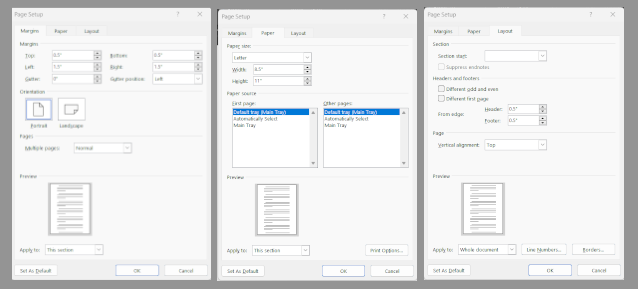
Ebook-FormattingFromWord


document-styles-and-headings

NEXT STEP:  Spend time changing your styles.  You will need the following:

Normal - with indent of .02" 
Normal-no-indent - for first paragraph after Chapter
Book Title
Book Subtltle
Book Author
Scene Ending, if applicable

I take away all of the styles that I won't be using.  This makes your template more sleek.  You don't have to comb through all of these styles that you will never use.  In order to delete them from the gallery, right click on the style and choose to remove from the gallery.

FORMATTING THE PAPERBACK:

KDP suggests you use Kindle Create to make the manuscript, but it was always too finicky for me.  I use the same manuscript size for the paperback, 5.81 x 7.81 and just use only page breaks, no headers and no page numbers.  I haven’t ever had a problem.

The following pictures are for the eBook and the Paperback.  I’ll write them below.
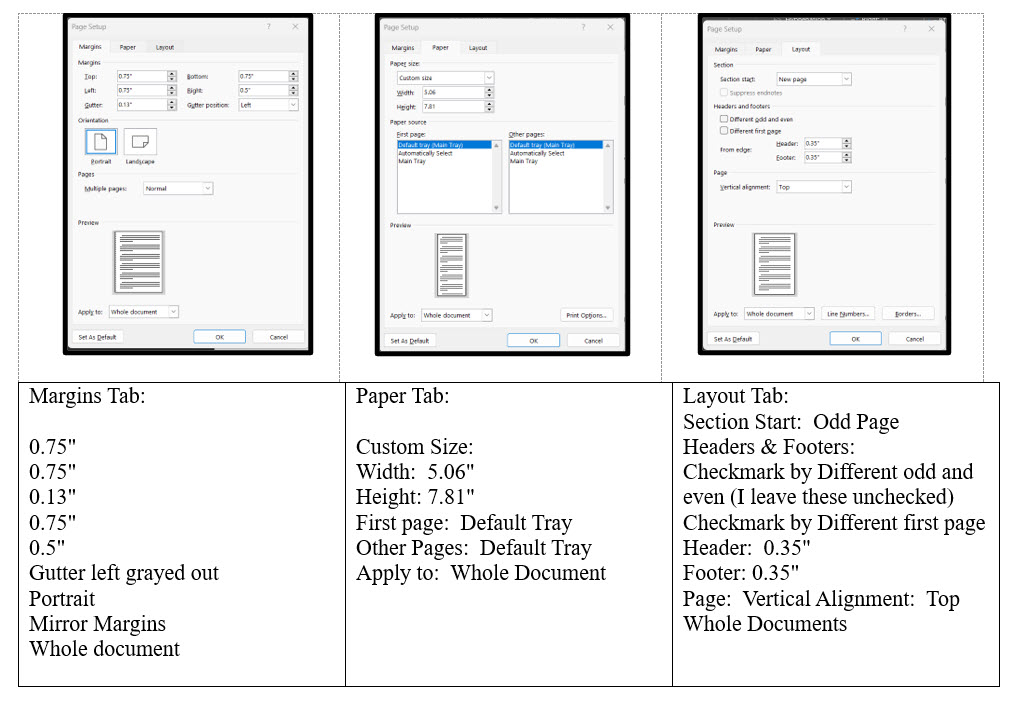
Paperback-Settings-in-word

FORMATTING FOR EBOOK SPECIFICALLY:

Use simple page breaks.  Don’t add page numbers or headers

FORMATTING FOR PAPERBACKS:

You need to use section breaks at the end of each chapter so that your chapter pages are on the right hand side in the real-world paperback.  That is considered an “odd page”  The book title is the first page and you want that on the right-hand side.

You need to put in page numbers and headers for the Paperback.

You need a full total of pages.  By skipping some even pages and numbering the first pages with Roman numerals, be sure you take the total page count from the bottom of your Word document.  It will be more than your pages in the book.  That is the number you will need to go to the Paperback book cover calculator


CHANGES FOR THE HARDCOVER MANUSCRIPT:
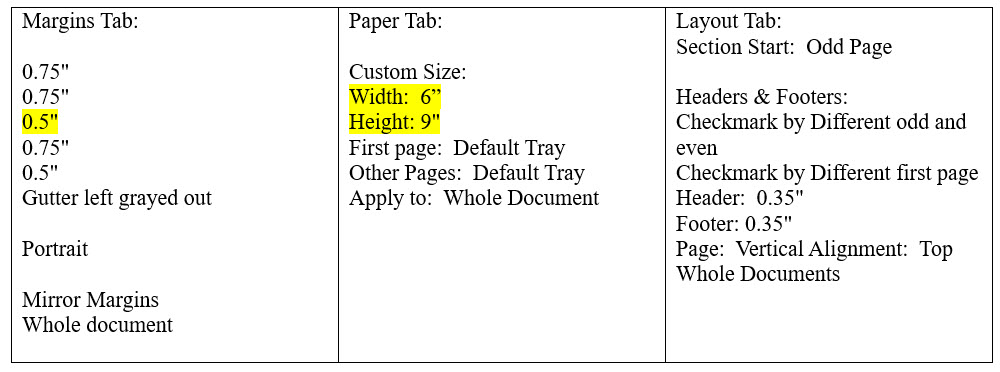
Hardcover-Settings-in-word

FORMATTING FOR BOOK COVERS:

EBOOK COVER SIZE:  1600 X 2560 – 300 dpi
If you will be using a cover on the web, make a copy of your eBook cover at 72 dpi.  This will make your cover images faster to upload and download on the web.
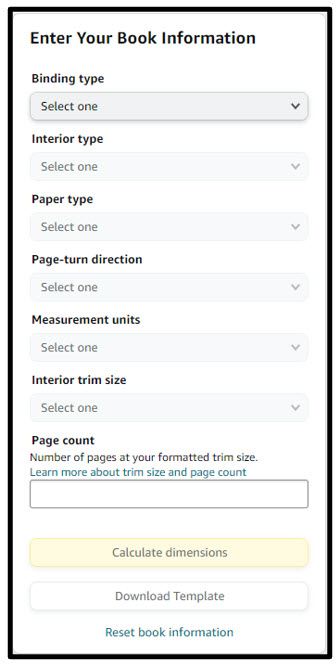
KDP-calculator
Paperback Hardcover Book Cover calculator: https://kdp.amazon.com/cover-calculator

Once you have the number of pages of your paperback, go to the calculator at the link above, and click through the calculator and choose what you want.
Then choose the proper trim size. I use Width: 5.06"
And Height: 7.81". The proper size for your Paperback and Hardcover should be determined by the average in the genre of books you are writing to.
If you use 6” x 9” for your paperback, then you can use the same manuscript for the Hardcover and only have to redo your Hardback Book cover
Tip if you are using Gimp: Once you create your book cover graphic in layers, save the Gimp file and export to a jpg. Then open the jpg separately and export and save a PDF. I say this because when I was new, I was hours and hours trying to figure out why my text kept getting thrown off-kilter.

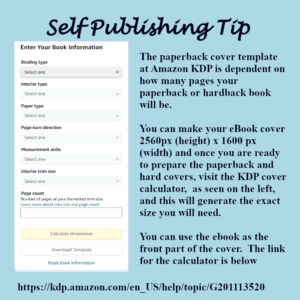
Self-Publishing Tip – Cover sizes

Cover Sizes - Which Comes First?

I chose to write this blog post for new authors who struggle, like I did, when it comes to getting things together right before self-publishing your own books.  I managed to flip upside down when it came time to uploading and publishing.

One reason I went upside down was because I was nervous about doing something I wasn't familiar with.  The second reason was that I had done so much research that I was overwhelmed with information and I had the information in different places.  Sheer confusion.

WHAT DO YOU ABSOLUTELY NEED TO UPLOAD AN EBOOK COVER AND A PAPERBACK COVER ON KDP.AMAZON.COM?

The ebook cover needs to be 2560px (height) x 1600 px (width).  The instructions say the ebook only has to be 76 dpi, but I always make sure mine are 300dpi.  It's just more high quality.  Amazon has a way of compressing them and they always look good online, so I would suggest you do the same.

It's all about the size.

76dpi, 150dpi and 300dpi - What's the difference?

The difference is size in dots per inch.  Without getting too technical, which isn't necessary, 76dpi is the most common size to use online, on websites, anywhere that you want your pictures to load fast.

150dpi is a bigger size, and that is seen sometimes online.  But that would usually be used for someone publishing actual artwork or photography.

300dpi is what a printer would need to print a color copy of anything.

72 dpi is referred to as "low resolution" and 300dpi is considered high resolution.

IMPORTANT LINKS TO KEEP HANDY:

Amazon offers a Cover Creator, but the covers are template based and it's best to learn how to use Gimp or some other free graphics program in order to make a cover.  They aren't hard to do.  Stay tuned for videos on how to easily make a cover.

The information about formatting in general begins at this link.

The paperback calculator is at this link.


Self-Publishing Tip – How to Add Chapter Header Graphics

START WITH A SIMPLE WORD FORMAT

I've been struggling with trying to do this for about three years!  I finally figured it out, thanks to some other YouTubers, one of which was Derek Murphy -- who knows all things when it comes to self-publishing!

I write in Scrivener and when it's time to proofread, I compile into Word and do the proofreading and editing there.  So I start with simple formatting.  This simple formatting will make adding the chapter graphics easier.  You need to trust me on this.  You will want to embed your fonts in Word also.

We will be going from DOCX to an ePub file.  So as a reminder, make sure you do your Table of Contents using the Heading 1 links.  I only have 3 pictures that I use in my books.  One is a small publishing icon, one is a small scroll I use on the Note to Readers page, and the last one is the Chapter Graphic itself.

IMPORTANT:  One more reminder to do your Table of Contents in Word using the links and Heading 1.  If you forget this, you will have to redo the entire process I'm showing you!  (Speaking from experience)

IMPORTANT:  See above.  Leave one blank before your Heading 1/ Chapter Titles.  You will thank me for this later!


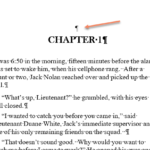
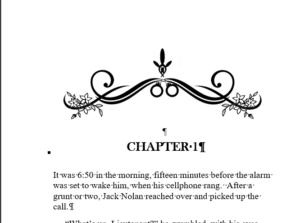
Chapter-graphic-example

IMPORTANT:  Only add one chapter header picture right before Chapter 1.  Make sure it is wrapped “top and bottom” and also aligned to center.  See above picture.

Save the document as a .DOCX file.


CONVERT TO A ePUB

I use a service called convertio.ca.  (https://convertio.co/) I believe you can use this once for free, but I pay for it as I use it all the time.  If you search for 'free ebook converter', you may find another free ebook converter.  I  used to use a Chrome extension that was similarly named, convertio or something, but it stopped working for me.  You can see if they have another one in the app store if you don’t want to pay to convert.

Go to https://convertio.co/ and upload the manuscript.docx file and choose to convert into an ebook and then choose ePub.  Then click on the convert button.  It may take a few minutes to throw up a download button.

NOTE:  During this process, your ePub will pull in all of your pictures and separate your chapters into separate files.  That’s why you only want to add the one chapter picture.  You can use the same one over and over in your document and keep the transfer cost down.

Once this is done, click on the download button.  It will most likely save to your download folder.  If you want to download it into your manuscript folder, you will need to choose that folder.   In any event, it will be downloaded onto your hard drive.


DOWNLOAD SIGIL PROGRAM - THEN OPEN IT:

ONCE IT IS DOWNLOADED, open your Sigil program.  If you don't have it yet, it's a free download.  Go to https://sigil-ebook.com/sigil/download/ and download your version.

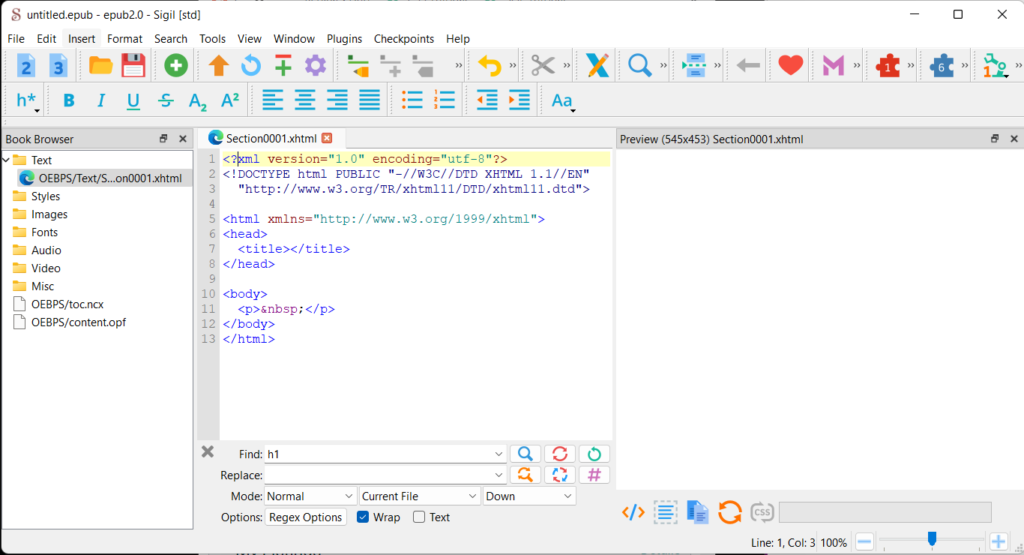
Once it's downloaded, open the program up.  When it opens up, it will be sort of blank, like above.  This is what a blank ePub document looks like.  We won't be using the blank document.

Click on File => Open => Choose your recently-downloaded manuscript.ePub file.  It will open it up in the Sigil program.

sigil open program

Once you open your manuscript epub file, it will pull in all of your chapters as individual html files.

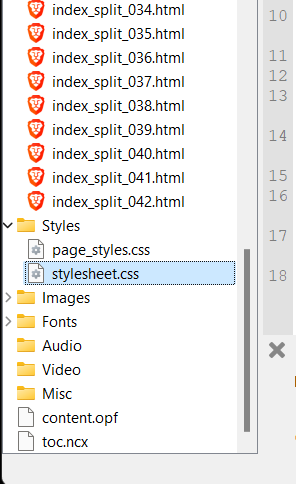
Then there is a Styles folder.  We will be making changes to the individual html files, the Title pages, and the stylesheet.css.  Be sure to use the style sheet I have highlighted to the right.

Your images from your eBook will be pulled into the Images folder by the convertio process.  You will be using the one chapter header graphic over and over.  You have everything you need to begin to format the chapter titles.


LET'S ADD THE CUSTOM STYLES:

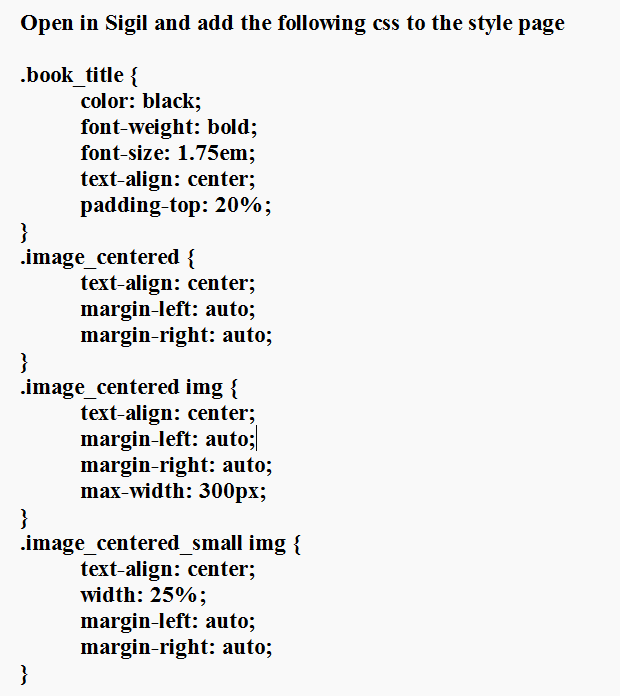
Sigil-css-styling

You will have to type out these codes.  Each digit and space is important.  If you forget one semi-colon or bracket, the codes won't work.  So double check your work before you copy and paste into the Styles document.

DIRECTIONS:  Go to the File Listings on the left side.  Find the Styles folder and double-click on the stylesheet.css file.  When it opens, scroll all the way to the bottom of the file.

Copy and paste the above coding into the page and save.  There is a save icon on the top menu of the Sigil program.  Or you can use Control S to save.

** See below for further coding explanation

FIX THE TITLE PAGES:

Nowt that we have saved the new css codes, it's time to change the files to pull in the new coding.

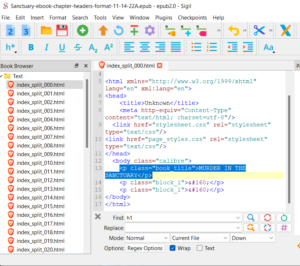
Looking at the diagram above, double click on the first file, marked index_split_000.html.  This is the first page, which is my Book Title page.  Now, even though I have coded this in Word to align to the center of the page, the ePub converter ignores this and throws my title onto the top of the page.

So I will change the class name from whatever it is (this will be auto-generated by your ePub converter) to "book_title".  (Note:  Be sure to use an underscore, not a dash)  This will then move the title down 20% from the top of the page.  I use 20% because when someone reads on a tablet in landscape, I don't want the title to disappear from the page.  By moving it only 20% down, it is still 'above the fold'.  If you don't understand this, don't sweat it.

I do the same thing on the second Title Page in my manuscript.  Make the same change to "book_title".   Changing the class name to "book_title" is the only change you need to make.


NOW WE WANT TO ADD THE CHAPTER GRAPHICS:

Sigil-book-image-coding

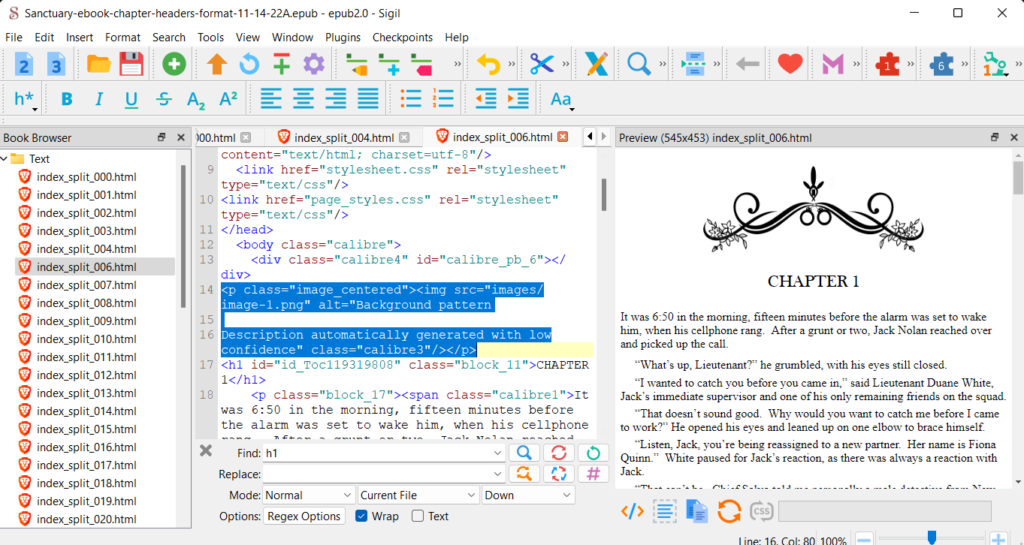
Double click on the first chapter page in the document above.  There will be auto-generated html coding referencing the picture.   If you look below, I have changed the coding to reference the class of "image_centered".  That's the only part of your coding that needs to change.

Once you have made this change, copy this to your clipboard.  (Control C).

Sigil-html-before-picture

One by one, you want to double-click each chapter to open it, and copy and paste this coding right above the CHAPTER 2, CHAPTER 3, CHAPTER 4, etc, in each file.  It will be a little time consuming, but believe me, it is MUCH EASIER than hoping and praying that you can get a converter to get the spacing and alignment right.

Once you have finished each one, you can then save your work, and email it to your Kindle account and check it on your ereader and on your cellphone.  I have had a perfect conversion using this method.

I hope I have helped you save all the frustration and hair-pulling I did in searching for a way to do this!

** FURTHER EXPLANATION:

The css codes added some alignment codes, to make sure they are centered.  The max-widths of 25% are to make sure my publisher icon is not too big, and the max width of 60% is to make sure the chapter header graphic does not come up too big.  The rest you don't really need to know, but if you are curious, you can go to W3School CSS to learn more.

These codes are used to style my chapter graphics, the book titles and the small publisher icon and another small graphic I use.  So if you are only adding the chapter headers, you will only need to add those codes.

Sign up below to get a download of a checklist on everything covered in this blog article.  Learn how to use Sigil and create an eBook.

Sign up below for the weekly newsletter.


Book Launch – Early Market Research – Part 3

***    EARLY MARKET RESEARCH   ***

While your book is still being edited, you can do early market research.  Begin by going to Amazon.com and searching out your main category.  Record the names of the authors, the name of the books, and any series names.  These will come into play later on when I tell you about two YouTubers you should watch and subscribe to.

Below are two videos from these two YouTubers who really helped me the most when it came to marketing eBooks on KDP and also researching eBooks with marketing in mind.  You should watch these videos and comb their video library for other helpful advice.   The only additional thing I will mention is that I also scroll down the book pages on Amazon and notice what other categories my competition is listed in.  Write the category names down.  You will get many more categories this way as Amazon is adding new ones all the time!

PICKING THE BEST CATEGORIES FOR YOUR BOOK LAUNCH:

Below is the video from Self Publishing Titans.  He offers a free tool that I have used and it is great for picking the best categories for your eBooks.  The tool is free and it's a cinch to install.  He goes over the tool and what it can do in the video below.  I would also recommend that you subscribe to his YouTube channel as he has amazing insights and his videos are straight to the point.


I learned from Self Publishing Titans about doing my pre-launch research.  I found many more categories that I never knew existed.  By doing this early research, I was ready with my 7 keywords and 10 book categories that I would need when it came time to upload my eBook.  So have a look see at his video.

THE BEST LAUNCH STRATEGY VIDEO:

Below is a Best Book Launch Strategy video that I found amazingly helpful as a beginner.  He also has wonderful insights into how the algorithms work, etc.  Be sure to watch the video and subscribe to Dane's channel as he has a lot of great information.

This could take several days, but your eBook is with the editor anyway,  so you should have the time!

Book Launch – Writing Descriptions and Blurbs – Part 2

***    WRITE DESCRIPTIONS & BLURBS   ***

I start by writing a rather long (350 to 450 word) description.  This is good for Amazon and the paperback cover.  To be honest, I’m not that great at blurbs and descriptions, so I find someone on Fiverr and have them write a blurb and description.  I paid about $25.00 a piece for two blurbs.

From the larger description, I keep reducing the description down to one or two lines.  I do this because if you run ads on Amazon, you only have a couple of sentences.  Same with Bookbub and some other websites.  So it’s a good idea to do this when you have the time.  I get antsy when my book is being edited so this is a good way to spend my time!

I also begin work on 3 new possible stories for new novels to get my juices going.

***   CREATE A LAUNCH CALENDAR   ***

I don't pick a launch date until my book is back from the editor and ready to upload.  I prefer stress-free writing and launching, so I wait until I'm ready to go.   Once the book is done, I pick a date 2 months away.  This gives me a chance to get Advance Review Readers and some feedback from at least some people.

book-launch-calendar

You can create a separate Google calendar for this.  I use an Excel sheet, as shown above, and fill in the dates and what is going on at that time.  This allows me to keep adding and removing things.


Book Launch – From Proofreading to Editor – Part 1

***    FROM PROOFREADING TO EDITOR    ***

Book-Launch-Front-page

Go over your proofreading check list and make all the changes.  Read it on NaturalReader.com or use Microsoft Word to read it aloud to yourself.  Then hand it off to an Editor.   They will take a minimum of one month to do a line edit.

Once the Editor has the book, I usually rewrite the first chapter to see if I can improve upon it.  And often, I do the same for the last chapter.

***   BEGIN ON YOUR BOOKCOVERS   ***

If you do your own creative work, make at least one eBook cover.  The template for Amazon KDP is 1600 pixels wide x 2560 pixels tall.  Make the front cover using the template and a back cover using the same template.

If you do not do graphics, find a eBook cover maker on Fiverr or somewhere on YouTube.  Copy about 5 book covers from your genre to show to the eBook  creator.  Tell him/her that you want yours to “fit on the shelf with these”.

The Paperback cover will need to know the page count in order to get the proper template from KDP.  When you have a page number for the paperback, go to the KDP Paperback Calculator:  https://kdp.amazon.com/cover-calculator  Once you have your template, you can add the front eBook cover and the back eBook cover that you made and blend them.