
WHERE WE ARE BEGINNING IN THIS BLOG POST:
I left off writing about how I divide the crime skeleton, after adding in the subplots, into the Four-Part Structure. I am now entering the third layer of writing. This blog post and video below are about sketching in the plot outlines.
WHERE WE ARE GOING:
 Most new writers want to get to the writing already. But in this layer of writing, all plot holes or inconsistencies will show up. Any clues that won't work when adding more suspects and motivations will show up in this layer.
So this layer is like an insurance policy that you won't be writing for the trash can.
USING THE SHORT TEMPLATE:
 My template is short but it keeps me on track. I'll break it down below. This small template I use keeps my writing on point and tight. It prevents me from meandering, dawdling, going off on an irrelevant tangent or writing myself into a corner.
POINT OF VIEW
 n order to prevent head-hopping, which is very common among new writers, you need to be constantly reminded that each scene is in one perspective. Some writers write in first person and that's easy.
However, I write in third person - one persons perspective. This prevents the reader hopping from head to head. It's too confusing for a reader to do that.
However, I don't choose my point of view this early on in the process. I wait until I am actually writing the scene before I choose. In my experience, as you write the scene, the first draft, one character will sort of 'claim the scene as their own'. That's when I choose the point of view and then make sure the entire scene is in that persons perspective.
Now, I must confess, since I write in third person narrator style, I do allow myself one tiny head-hop at the end of a scene if I think it serves the plot well. I think any reader can handle one tiny head hop.
I'm a self-published author at this time, and one of the benefits of self-publishing is you can do what you want. The professional publishers may be horrified by allowing one head hop at the end of a scene, but as a self-publisher, I can do what I want. (Hee hee)
KEEPING TRACK OF TIME
 I don't know whether I am an author who is obsessed with time, or whether I use time as an element to put pressure to solve on my characters, but I have always tracked time. I find this helps me balance the story and make the story more realistic.
What I mean by that is often times there is so much that is happening in a book on one particular day, that it becomes unrealistic that all of this could happen in one day. Maybe it's just me.
Keeping track of time allows me to also know when the workday is over and the subplots can enter the scene as most subplots happen at least in part in a character's off time.
CHOOSING A SCENE LOCATION:
 Location is important for two reasons. One reason is casts the scene in cement. You have chosen a stage for the scene to take place. I don't write any scene or location descriptions in this layer of writing. But I can write the action of the scene in context of a location.
Secondly, adding the location in this layer allow me to go off and find photographs that I can use in the layers down the road where I will add descriptions into the story.
PURPOSE - MOVING THE STORY ALONG
Every experienced author who I listened to when I was first writing fiction said the same thing: Everything in the manuscript is there to move the story along. If it doesn't move the story, it doesn't belong there. So this Purpose in my template helps me keep my writing tight and on point.
CLUES - KEEP TRACK OF CLUES

This one is self-evident. A crime novel, murder mystery or police procedural is about solving a crime or mystery. So uncovering clues, following them to the next clue is the vehicle for the story. So it's important to keep track of clues.
In the first stage of writing, it's easy to remember if you put clues into the story. In the first draft, it's easy to rely on your memory. But after you've read through the story a bit and begin to add more to it, you won't be able to remember whether you saw that clue in the last chapter or the last time you read through the entire layer.
So it's important to keep track of clues.
DIVIDING AND CONQUERING THE MANUSCRIPT:
By dividing the story into four parts, and then writing scene outlines, you can divide a huge manuscript down into bite-size pieces. It is less overwhelming and easier to organize, write and keep track of.
HOW SCENE OUTLINING WORKS IN SCRIVENER:
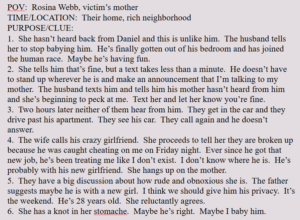
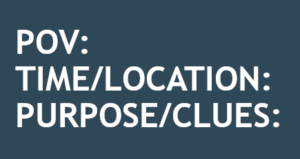
You can watch the video below for a full explanation, but each scene begins with the template. I leave the POV blank for now. I choose the time and location. And then under Purpose/Clues, I add everything I want to happen in this scene. I am thinking about the main plot, the dripping of background info, the dripping of clues, and the subplots.
I use numbers but using bullet points would probably be best as I have to change the numbers a lot. Although when I show you the rest of my technique, you will see that the number themselves don't matter.