When you sit down to outline your story before you write a single scene, something shifts. You stop thinking like a writer and start thinking like a builder. That's the whole point.
Most new writers want to jump straight into scenes and dialogue. They've got a great opening line in their head, and they just want to get on with it. But here's the problem: when you write first and figure out the story second, you end up rewriting. A lot. You'll discover halfway through chapter five that your killer couldn't have been at the scene, or that your protagonist's motivation doesn't hold up, and now you're tearing apart pages you already fell in love with.
Outlining lets you put on a few different hats before you ever put on your writer hat. Each one has a job to do, and if you do those jobs first, the writer hat gets to show up later and just write — no backtracking, no throwing chapters in the trash.
Here are the professional hats you'll need to wear:
The Brainstorming Hat — This is the first hat, and it's the loose one. You wear it when you're sketching out a few possible storylines, just to see which one has legs. This is quick work — short, messy ideas, not finished plots. The goal isn't to pick "the" story yet. The goal is to make sure whatever story you commit to actually has enough potential for twists, turns, and a full novel's worth of trouble. Don't skip this hat. Committing too early is how writers end up 40,000 words into a story that runs out of gas.
The Story Engineer Hat — Once you've picked your storyline, this hat goes on. This is where you lay out the bones of the story — what happens, in what order, and why. You can do this with short paragraphs, a bulleted list, index cards, whatever gets the structure out of your head and onto something you can look at. It won't be pretty. It's not supposed to be. This is the layer where you make sure the story actually holds together before you build anything on top of it.
The Location Scout Hat — This one comes after your story has taken shape in the engineering stage. Now you go looking for the places where all of this is going to happen. Where does the crime scene sit? What's down the street? What does the neighborhood look like? Putting in a little effort here pays off twice — it makes your story feel grounded and real, and if you've ever thought about your book being adapted for film or streaming, having real, scoutable locations gives you a head start.
Wear these three hats well, and by the time you put on the Writer hat, the heavy lifting is already done. We'll talk about the other hats you wear before the Author's Hat in our next article.
Below is a video I made for YouTube explaining the initial stages and layers of writing. I go over some of these points but others tips and tricks as well. For your convenience, I have time stamps below in case you want to just jump to the section you want to look at:
01:27 - Open Scrivener and open one document 01:45 - Other suspects, their motivation, red herring, etc. 02:15 - How it will End section 03:20 - Determining the framework of the script which will prevent writing for the trash can. 05:30 - Review of the layer elements 05:43 - Sneak peek into the next videos
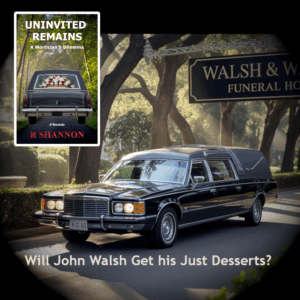
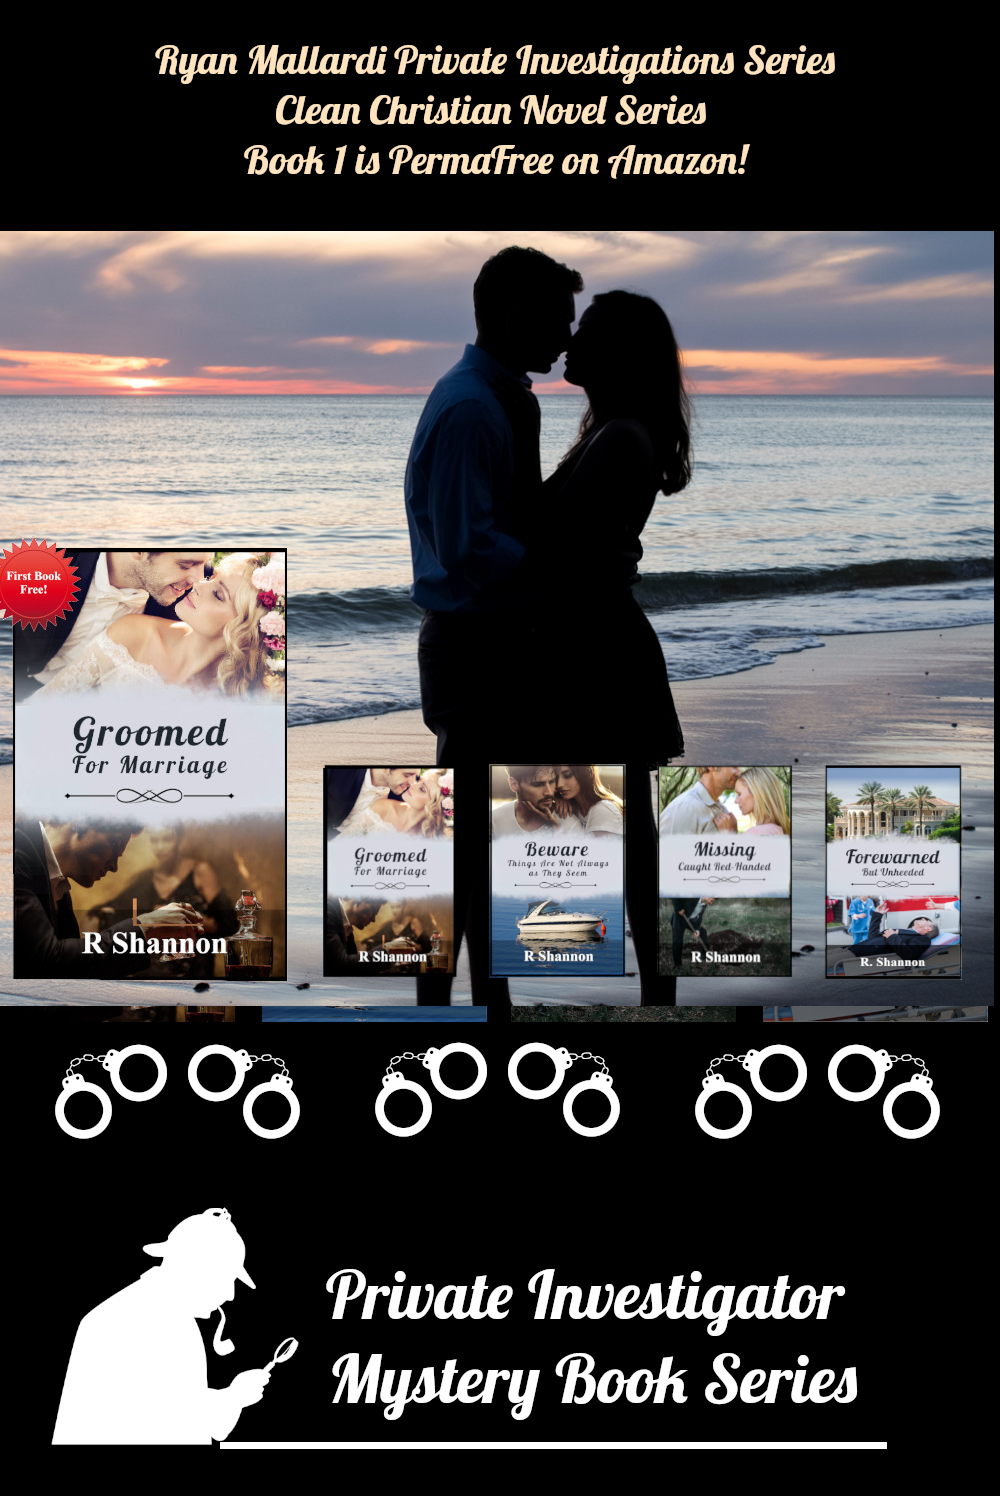
John Walsh is a successful funeral director with a loving family but he has a weakness for other women. The modern world thinks cheating is a victimless crime, but is it?
This blog post will be a peek behind the author workflow in Layer 5 of my Novel Writing in Layers Series. I am writing Book 6, Majestic Landings, in my police procedural series, Jack Nolan Detective Series.
Let me set the table, so to speak, about where I am in the book right now. I just finished Layer 4 which is the Down and Dirty First Draft, which I believe is the hardest layer to write.
BEGINNING LAYER 5
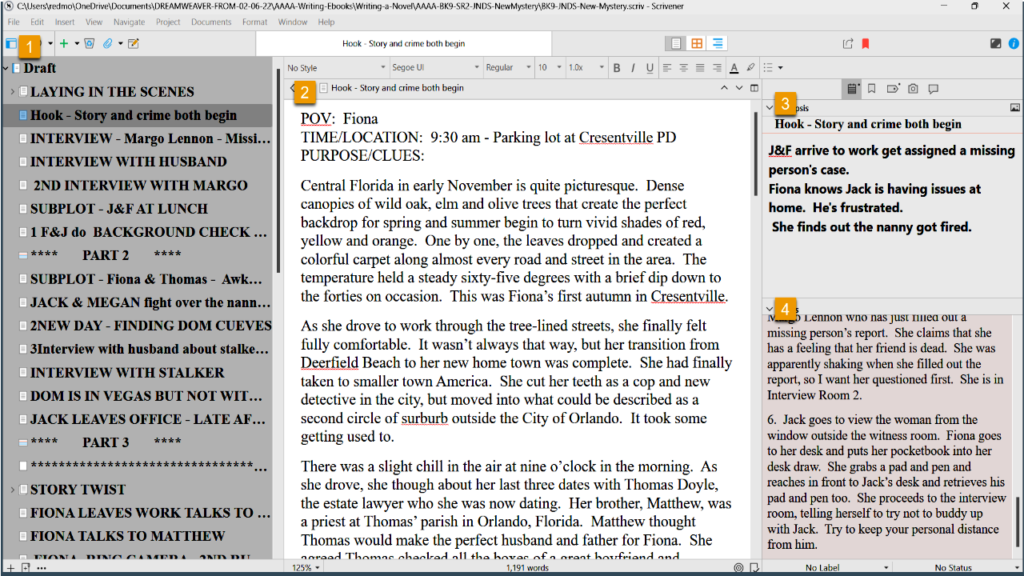
Above is a snapshot of the book as it now exists in Scrivener, which is the program I write Layers 1 to 6 in. I have gone ahead and filled in a few of the scenes so that I can explain to you what I do in Layer 5.
ON THE LEFT SIDE IS THE BINDER: The top folder is called draft, which is a default in Scrivener. Each sub-document is one scene in the novel. I also add in a few blank documents between Parts 1, 2, 3 and 4, so I can see how the story action is balancing inside the plot structure.
IN THE CENTER PANEL: This is where I write the scenes.
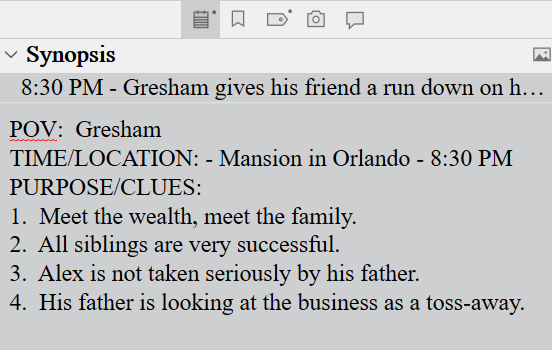
ON THE RIGHT SIDE IS THE INSPECTOR WINDOW: This section allows you to add a scene synopsis on another tab, but above, I have captured what it looks like on the Metadata Section.
WHAT HAPPENS IN LAYER 5?
This is my first layer of proofreading. I only focus on the following things in this layer of writing.
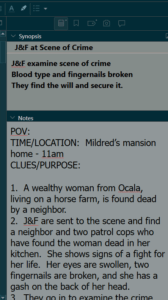
1. Making sure the scenes line up and flow smoothing and fill in the Synopsis box if I forgot to do it in Layer 4. I have a snapshot of the Synopsis box to the right or below. This allows me to look at my work in the Outline Mode where I can see the novel from a bird's eye view.
Since it's in the photograph here, I will also mention that I copy my scene outlines and paste them into the Notes section in case I want to review them.
2. I enter all of the character descriptions and location descriptions in this layer too.
3. I also check on the crime and investigation timeline as well as the novel timeline.
3A: The crime timeline I track with the metadata, which I will mention again below. I also use the Scrivener Highlighter to set off anything that references the crime timeline. This way, towards the end of this layer, if I decided to tighten up the timeline or find out I need a little extra time, it is very easy to quickly scroll through the novel and find any references to the timeline easily.
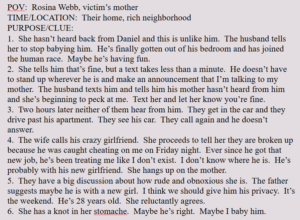
3B: All novels have a timeline too. A crime novel is usually a day to several weeks; whereas Gone with the Wind cover years and years. In each scene, I start with a little template referencing the point of view, the time/location and the clues/purpose.
As stated above, I read through the scenes, making sure that the last scene flows into the next scene. For example: If my detectives 'get into the car to return to the station,' I make sure I'm not referencing where they were before they got into the car, and stating again that they are entering the car.
I also watch my novel timeline to make sure the timing in the day is lining up with what's possible for human beings. In my humble opinion, authors have a lot of leeway to stretch the day, if needed, but if we go overboard, at some point, it pulls the reader's mind out of the book when they realize there's too much activity for one day as humans. By keeping an eye on the novel timeline, this prevents me from stretching a little too much.
THE METADATA - HOW AND WHY TO ADD CUSTOM META DATA.
Some authors probably don't use the metadata section and that's fine. But I like to look at the novel in the Outline Mode and this is where the custom metadata comes into play.
Every novel is different, so I am focusing on different things in each one. In this novel, there are multiple suspects, all of whom have shaky alibis, so the crime timeline and some other things are very important. So in this novel, I created metadata sections as follows:
Major Event - What happens in the scene
Technical information - Names, addresses, where body was found, first witness, etc.
Clues dropped - Chronological list of clues that drop
Time Line of the Crime - Time of death, time body was found, etc.
Relationships - Romantic Subplot and Character Arcs
WHAT'S NEXT IN LAYER 5?
Once I proofread all the way through, add in the descriptions, and my meta data, then I want to look at certain things to check on myself. I can set up the Outline Mode so I can see the Synopsis, the Clues, and the Crime Timeline side by side. I will post a picture below.
I can then look closely to make sure I don't mention a lab report that hasn't been delivered. Or one of the suspects is mentioned before anyone points them out, things like this.
I can see the chronology of the clues that have dropped to make sure that they are chronologically correct. I'm sure you get the drift.
My color scheme in Scrivener may make some of these things hard to see, so I have posted the Custom Metadata diagram below so you can see where things go and what the icons look like.
After looking at the various meta data in this bird's eye view setup, I'm ready to enter Layer 6, which is another round of proofreading; and again, I only focus on a few things.
I have done a short video about this in case you want to see me go over it inside Scrivener. There is a bit more information here for beginners, but it's good to watch it live too.
Be sure to check back to see another Live Peek Behind Layer 6! Be aware that I am not proclaiming myself as an expert novelist or the knower of all things. However, I used to search all the time for authors' workflow, but nothing ever showed up. I believe I could have advanced a lot faster if I had tips from more season's authors and that's my purpose here.
By seeing how one author does things, you may only take away one tip that will help you in the system you already use. I hope this blog post helps!
There are many blog posts and videos on the internet about how to write a novel. Much of the advice is general in nature and only broad-stroke tips. This video seeks to go one step further and open my last book, which is still being proofread in Layer 8, and show a work-flow demonstration.
WRITING TIPS AS AN APPLIED SCIENCE:
Many of the tips that I came upon when I first started writing were great but I didn't know how to apply them. Many techniques require a second phase of 'how to apply this advice'. This is most times missing from the how-to blogs and videos.
THIS IS THE VIDEO I WISH I HAD WHEN I STARTED WRITING:
I am not holding myself out as an authority on writing or even writing techniques. The purpose of this video is to show one work flow that other newbie writers can see that will hopefully help them see the theories in these how-to videos and blog posts in action. That's my purpose here.
WRITING IN 8 LAYERS:
I am in the process of finishing my 14th novel. I started out like many of you as a self-taught author who took in unorganized, uncurricularized information and had to make sense of it all. I devised this 8 Layer system to try to write a novel as efficiently as was possible. I offer it to you for whatever weight you wish to give it.
VIDEO 1 - Layers 1 to 6
In Video 1, I go into the process of coming up with a broad-stroke storyline that you know you can use as a story spine. Presently I use FreeMind.com software; it's free and it's easy to use. I go into a little detail about this, but I have other blog posts and videos on my YouTube Channel where I go into more depth about how I do this.
Then I go into Scrivener for Layer 2 through Layer 6. I demonstration what happens in each layer and I try to give beginner tips in each layer to further help the newbie.
VIDEO 2 - Layers 7 & 8 - in Microsoft Word
In the second video, I go into Microsoft Word and complete Layers 7 and 8. I believe by seeing this behind-the-scenes look at a real novel, it will encourage newbies who may be struggling with the actual work flow of writing a novel. I hope you enjoy it.
Be sure to join my newsletter for book promotions, free books, movie reviews from a writer's perspective and some other goodies I will share along the way.
LAYER 1 - Putting Together the Skeleton of the Mystery or Crime
In a mystery, crime novel, or thriller, the clues and their revelations need to be planned so the story clues can remain disjointed in the beginning, but then slowly come together like a jigsaw puzzle. This keeps the reader guessing -- which is part of the mystery readers' enjoyment.
Layer 1 requires the skill of story engineer, not so much an author. In my humble opinion, trying to write around this initial phase of story scaffolding is is one reason why novels can take authors years to finish. Scaffolding-panel.png
So the first layer is to storyboard only the crime or the mystery of your novel. This layer can look like a long list of crimes and clue elements,
or it can look like a mind map sketched in pencil on the back of a large piece of wrapping paper, or it can be done in a mind-mapping software.
But there will need to be initial planning of where the mystery begins, where it leads, and how it ends. That's what goes on in this layer.
WHAT TO FOCUS ON IN LAYER 1:
An example for a Layer 1 crime mystery would be the following:
1. Lay out the chronology of the crime.
2. Who is or are the Victims?
3. What is a list of clues that could lead to the solving of this mystery?
4. Determine what the final clue will be that reveals the true culprit and think about how you can hide this clue in plain sight. This will be the clue that solves the mystery.
5. Determine what the first three or four clues will be that will bring in multiple suspects. Give each suspect a motive for the crime and decide how and when you will reveal this motive
6. Choose an unlikely suspect and give this person a good cover story.
7. Even at this early stage, figure out how the mystery or story will end. This can be changed during the creative process, but knowing where your story will end, will give you a writing destination. This will prevent you from winding up writing yourself into a corner somewhere or writing yourself into a tangent that will have to be nixed anyway.
WHAT ABOUT OTHER GENRES?
Now, sometimes you will be writing a story that has a mystery ribboning through it but it's not as organized or as detailed as an actual crime mystery. Your outline will be shorter but will contain a skeleton of all the action. Below are two examples of writing a ghost story and writing a Gothic scary-house story.
LAYER 1 IN A GHOST STORY:
1. Who is the Ghost? Why has the Ghost arisen? Why is the Person not Resting in Peace? What is the Ghost's purpose for appearing? This is the backstory that will be dropped like breadcrumbs throughout the storyline. (Ghost-Story.png)
2. How can the Ghost first appear that will raise the question that maybe the viewer is just crazy? Or maybe the viewer is just paranoid? Give them a reason for this paranoia.
3. How will the Ghost appear and what clues will the ghost drop in order to trigger more of the mystery behind the Ghost's restlessness to play out?
4. Choose how the story will end and if the Ghost will achieve its goal and whether the ghost will now rest in peace or will the Ghost be back for another book in the series?
LAYER 1 IN A SCARY-HOUSE STORY:
1. What is it about the house that's creepy?
2. What is the House hiding? Is there a secret room? Is there a hidden person?
3. What happened in the house to make the house haunted or unsettled?
4. How will the mystery of the house play out? What is the chronology of the clues about the history of the house and why it is haunted? These are the breadcrumbs in this kind of a storyline.
5. Choose how the story will end and if the house is destroyed or if the house destroys someone, etc.
FORMAT OF LAYER 1:
Layer one can be done in a list format or with a mind-mapping software, or even with a pencil drawing your own game board or storyboard on the back of a large piece of wrapping paper. Choose whatever format helps you the most. If you're new, try each one. Finding the right tools for the right job is very helpful.
If your Level 1 looks like any of these, you get A+ Layer 1.
LAYER 2 - Break up the Story into a four-part structure or 3-act structure.
Open up a fresh manuscript document and split the clues and events into a four-part novel structure or a 3-act-story structure, whichever one you prefer. So this layer is easy and takes about five minutes.
LAYER 3 - Writing the Scene Outlines (Scaffolding & Storyboarding)
In Layer 3, you will refer to the Skeleton of the crime outline you already created. Following the chronology of the crime and the clue drops, write an outline of each scene. This is nothing more than another list of what needs to happen in each scene. You are not the writer yet. You are still the story engineer or the storyboard creator. This is the second phase of scaffolding that is setting the story up for when the writer comes in. The list should be concise, more like a list than big paragraph chunks.
Below is a Scene Template I use. I don't worry about the Point of View in this layer because you can wait to choose it. I wait to see who "steals the scene" when I'm actually writing. But I include it in a Scene Template.
POV: TIME/LOCATION: PURPOSE/CLUES:
CHOOSE A TIME AND LOCATION:
Choose a time and location, but don't describe any locations or characters yet. Purpose and Clues is a reminder that everything written has to have a purpose and every scene in a mystery should have some clues or a crime.
In the video on this subject matter below, I go into a few extra tips on using the scene template to help you in other ways.
LAYER 4: DOWN-AND-DIRTY FIRST DRAFT - NOW YOU'RE THE WRITER!
In Layer 4, you are finally the writer. The scaffolding is in place and now it's time to start writing the story. The first draft is the hardest layer of writing.
It may help to think of yourself as more of a Town Crier.
Your job in this layer is to blurt out the entire story. Just get it down in paper. Don't worry about spelling, grammar, descriptions of people. Like the cops say -- Just the facts. Write out the story and don't look back. Don't re-read anything. Don't get lost in verb tenses. Write and don't look back. Only look at your scene outline to make sure you have covered everything. That's the only concern.
THINGS TO WORRY ABOUT IN THE FIRST DRAFT:
Choose a location for the scene and a time. (Nothing is written in cement)
Make sure all of the clues and anything else from your scene outline gets into the scenes.
THINGS THAT DON'T MATTER IN THE FIRST DRAFT:
Spelling, grammar, sentence structure, too many adverbs, scene or character descriptions, foreshadowing, cliffhangers, quote marks, etc.
Just write what happens in each scene with whatever dialogue comes to you.
In the video below, I go into some detail about why this is important and how it can save you time in the end.
LAYER 5: 1st Proofread (The Read-through)
I call this the first proofread but it's really the first readthrough. Run a grammar and spell check in the beginning. This will clean up some of the down and dirty mistakes.
Begin to read through the novel as a writer. This is the layer that you will put in the descriptions of your main characters and the scene descriptions. You are not line-editing in this layer. You are reading for context and to make sure that your sentences flow one to the other and that the chapters flow from one to the other.
LAYER 5 CHECKLIST:
1. Are there any descriptions you need to add to this scene?
2. Is there any surprise in this scene? If so, can you rewrite it to make the surprise be a cliffhanger at the end of the chapter?
3. Has the POV been established?
4. Check on head-hopping.
SCRIVENER TIPS FOR LAYER 5:
Using Scrivener Find and Replace feature, set things up where you will automatically focus on your weak points. For example: I make all "ing" endings capitalized. I also capitalize the words BEGIN and BEGAN as well as the phrase IN ORDER TO. This way, I can't just scan over them without noticing them. It forces me to check whether I can change the format of the verbs or the sentence structures to past tense, etc.
Then I proofread the entire novel and focus on these changes. Here is a checklist for the scenes in this layer:
LAYER 6: The 2nd PROOFREAD
This is the layer you start polishing your prose in. Spellcheck and grammar check again before you begin. Then read through the entire novel for context and this time look at your sentence structure and verb choice.
SCRIVENER TIP: USING KEYWORDS FOR A CONTEXT CHECK:
Layer 6 is where I add the keywords in Scrivener. By using keywords, you can isolate certain scenes and then see them isolated from the rest of the novel. This is a great way to check on certain things in any story. Examples: Romantic Subplot, wedding talk, vampire events, interviews, clues dropped, etc.
Layer 7 - The Hardcore Proofread
Below is a list of things I do in Layer 7:
1. List Troublesome words - Just, like, adverbs. Compile a list of your favorites. I have compiled a long list of words that trip me up and I go over them in this layer.
2. Check your chapters in Grammerly for grammar verb tense.
3. Then I compile from Scrivener to a Word .docs file and paste it into an eBook template and save it as a Manuscript. I file it in a folder called Pre-Publication. Then I open it in Word and run Word's spell check and grammar check on it again.
4. Then I read it as a final proofread (even though it's not the final proofread!)
5. Check all Chapter Names are in Heading 1's for the Table of Contents
6. Fill in the Other pages: Title Page, Other Books By Page, Title and Author Page, Copyright, Table of Contents, Note to Reader, Acknowledgements, About the Author, Other Books By Page)
6. Find and check all quotes to make sure your quotes are in sets.
LEVEL 8: - FINAL PROOFREAD AND NARRATION
1. Using the read aloud feature in Microsoft Word, I read the book aloud as I read along with it. This gives you an idea of how the book will sound in the reader's mind.
2. I make any final corrections in this last proofread.
3. From here the manuscript goes to an Editor.
4. Then I forward it to myself as an ePub and while it's being edited, I read it again on my Kindle to see how it looks and feels from the reader's perspective.
The first thing you need to do is click on File => Options. It's down at the bottom of the options list under the File Tab. There is a picture to the right.
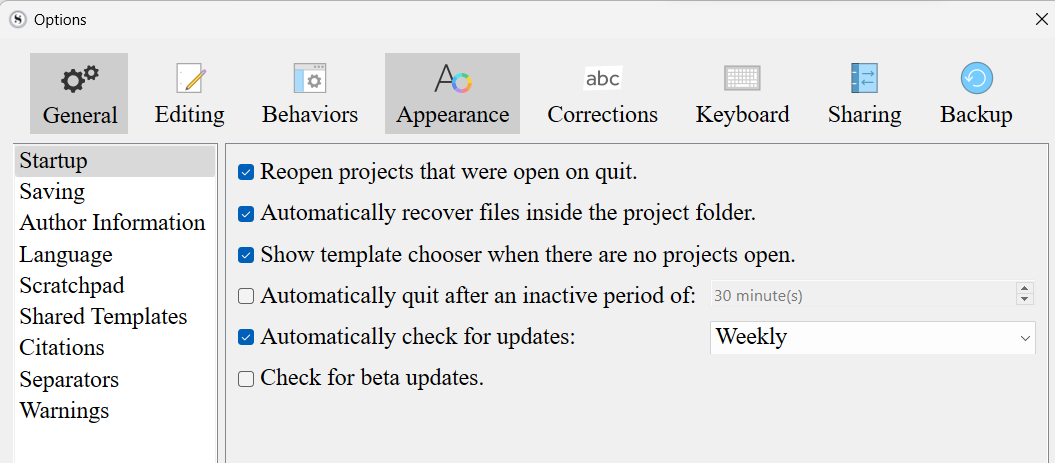
This will open a dialogue box. Choose the Appearances Tab. You can see it in the second picture above.
The last Peek Behind the Novel video may have been a tips video. So I'll just jog everyone's memory here. In Layer 4, that is the 'down-and-dirty' first draft. That's where, using my scene outlines, I write the scenes. I just keep going. I don't check anything.
WHAT WAS UNIQUE ABOUT THIS NOVEL:
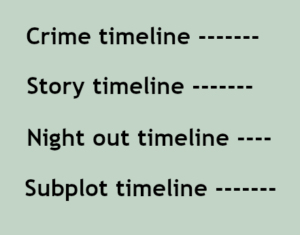
Although I follow a detailed outline of the story before I even start writing, each novel presents its own issues and/or problems. In this novel, I had several timelines I had to keep straight.
There is a crime timeline. Then there is the story timeline, where all the clues are dropped into the story. The characters had a night-out and that had its own timeline. Plus the subplot has a timeline.
Because I had to concentrate on keeping all of these timelines straight, I only sketched in the subplot. That means that in Layer 5, I will also be writing my subplot into the story. I can concentrate on the timeline for the subplot by itself.
However, I did leave guideposts in Scrivener for myself to make laying in the subplot easier for myself. As shown above, I write in a guidepost where I have free time for a scene from the subplot. I also highlight it so it's easier to find. Without these guideposts, I would have to pick through the whole novel looking for places to fit in the subplot scenes.
Another guidepost I left for myself is to highlight a timing that is involved in the subplot. By keeping this highlighted, it's a constant reminder that this timing may have to change as I write the entire subplot. This too prevents me from having to search and find or nitpick through the entire novel.
WHAT I DO IN WRITING LAYER 5:
Normally, Layer 5 is where I write in all of the descriptions; descriptions of the characters and the locations. I fix any glaring errors that pop out at me, but I make sure I don't get lost in any type of real proofreading.
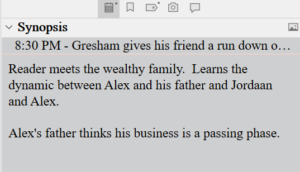
The second thing I do in Layer 5 is to fill out the Synopsis section. This section is in the upper right-hand side of the Scrivener platform.
I use only a few words to indicate what happened in this scene, especially what clues have been dropped. I don't use anything longer than a short sentence. The purpose for this is so that once I am finished writing Level 5, I can look at the entire story in Outline View. I have a snapshot of the Outline View below.
Once I have all of the scenes in and I have the synopsis filled out, I can view the novel from a bird's eye view again. This will let me know where the book is "sagging" or where I don't have enough going on.
I can see the weight of the story in this viewport. I can see the interactions of all of the characters.
LAYING IN THE ENTIRE SUBPLOT:
Now, because I had to kind of abandon the full subplot in Layer 4, I will be finishing the subplot while I'm doing the descriptions and the synopsis box. Once I'm done with this layer, then I'll be back to discuss what happens in Layer 6!
Benefits of Writing Fiction in Layers:
1. Manage creative energy.
2. Keep the entire novel project manageable
3. Writing in layers leads to several layers of accomplishment
4. A story written in layers is a richer and deeper story.
Tips on Writing in Layers:
1. Name each layer and know your specific mission. This leads to a
feeling of completion and also a feeling of accomplishment several times during the entire project.
2. Learn the difference between creative energy and drudgery energy.
3. By breaking the writing process down into layers, it is less taxing on your memory.
ONE: Turn Off Smart Quotes and Sentence Case Correction.
Turn these Scrivener features off, especially if you plan to move your finished novel draft into Microsoft Word for final formatting. Because I self-publish and I need to upload in ePub and PDF manuscript, I use Word for a final proofread and formatting. I find Word is the best choice for me. The smart quotes do not translate well between Scrivener and Word. If you turn off the smart quotes, Scrivener will replace them with straight quotes and these translate better.
There is really no upside to using smart quotes in a novel. This is not a feature that will prevent you from leaving out a quote. It's really useless for an author, so its best to shut this feature off.
The sentence case correction will not allow you to add a lower case letter after a period. This doesn't seem like it would be a problem, but at least once during a first or follow-up draft there's a time when this auto correct starts wrestling with me when I'm trying to do something. So I shut it off now at the beginning.
If you search "auto correct" in the Scrivener help bar, you will be able to open up this feature and uncheck these two items. You'll thank me for it later.
Also, there is a whole layer of proofreading that I'll be making a blog post about in my Peek Behind the Novel series where I will show you how I use the find feature to check on every single quote mark. I've always had at least one or two that almost got away! So the smart quotes are nothing but a nuisance.
TWO: JUST KEEP WRITING - DON'T LOOK BACK:
I'm writing my fourth novel in the Jack Nolan Detective Series. The book is still unnamed. This is Level 4 in my Eight Levels of Writing a Novel series. This first draft is down and dirty. It is the hardest lift of the entire project. At least for me, the first draft is the hardest. The characters all seem like stick figures. I find them unlikeable -- even if I liked them in the last book! Any humor doesn't seem to work. Everything just seems awkward. I have to literally force myself to keep typing. So this tip is to just keep writing. Don't check on any spellings or grammar. Don't even look back. Just keep going until you have the crime down, the main plotline down and the subplots at least in place. That will complete the first down-and-dirty draft. Every other layer will be easy compared to this one.
THREE: YOU CAN DO RESEARCH NOW ON THE FLY
With bard.google.com, now it's possible to do research on the fly when writing fiction. Simply open a browser window, type in bard.google.com and start asking it questions.
Unlike ChatGPT, Bard is a Google AI product supposedly still in beta form, but it works like a charm. Unlike ChatGPT, it can research using the internet. ChatGPT is limited by time; the cutoff for ChatGPT the last time I checked was sometime in September of 2021 I believe. The cut off of what it can access is now way over a year ago. So I find that Bard is a better option for book research so you can get the latest.
FOUR: USE THE SCRIVENER HIGHLIGHTER AS A REMINDER:
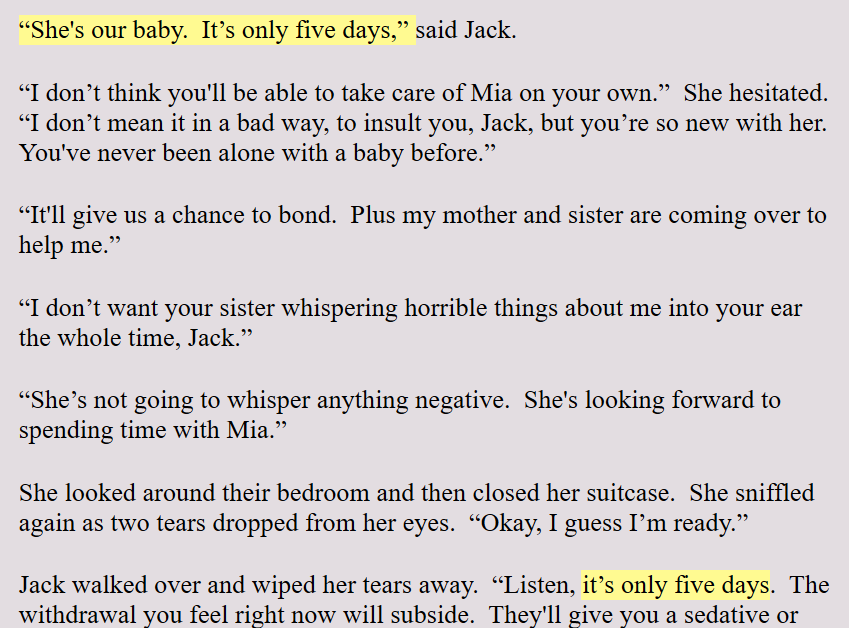
Scrivener allows you to highlight text in any color you want. I use this highlighter in the Level 4 Draft to make a mental note to myself to check on things. For example: If I say that someone is coming home from a hospital in four days, I highlight this. This makes sure that this lines up with the plotline, or the crime line, or the subplot lines.
As an author, I will often tweak the script, especially as I'm writing. It's too easy to forget this early reference to five days. By highlighting it, it's a reminder that this timing needs to line up with something later on in the story. I find this highlighter a great author tool.
FIVE: LEAVE THE POV | TIME | LOCATION HEADERS IN THE DRAFT:
Like I mentioned earlier, I'm in the first draft of my novel and each scene begins with the same Scene Template as seen to the left.
I leave the POV, which stands for Point of View at the top of each scene during the first draft. I don't choose the POV before I write the scene. I write the scene and see which character claims the scene. Then I assign that one character to the scene.
POINT OF VIEW: By keeping the POV at the top of the scene, it's a reminder to me to make sure the entire scene is in this one point of view. I admit that I allow myself one small head jump at the end of a scene. I'm a self-published author, so I can indulge myself and get away with this. I believe a reader can handle one head jump at the end of a scene for the purpose of informing them of what the other character thinks at one time. I don't believe one head jump creates that big of a problem.
TIME AND LOCATION: By leaving the Time and Location information at the top of each scene, it is a reminder to make sure I describe the scene and whoever else may need a description in that scene. In Layer 5 of my writing system, I go through all the scenes and add descriptions of the locations and people. So this information makes that level of writing easier.
SIX: KEEPING TRACK OF MULTIPLE TIMELINES:
I write Christian mystery romance, private investigator mysteries and police procedurals. By leaving the timings in the header to each scene, it allows me to keep track of the story timeline. I am always keeping track of multiple timelines in each novel. I have the crime timeline. Then there is the timeline of the investigation and the dropping of the clues. And the subplots also have a timeline as each book has at least a small character arc. This is because I write in series and the characters have one small character arc in each novel.
So that's a minimum of three timelines that I need to track. So keeping these timelines at the top of the scenes as I go from layer to layer of writing, it makes it easier to make sure things are lining up on each timeline.
I keep these headers inside the manuscript draft until I'm ready to put the book into chapters.
SEVEN: ADDING ADDITIONAL SCENES WHEN WRITING THE FIRST DRAFT:
There comes a time or two when I will decide to add a short scene or two. It may just be to have a change in the point of view or to get the characters to a different location. Whatever, it is, I use three asterisks between these two separate scenes. I also start the second scene with my normal Scene Template.
This allows me to know this is a separate scene and it will have a point of view. It also alerts me that I will need to insert a scene ending which I won't do until I bring the manuscript into Microsoft Word.
EIGHT: USE SCRIVENER SYNOPSIS SECTION TO KEEP TRACK OF CLUES DROPPED:
When writing the first draft, I use the Scrivener Synopsis section in the Inspector Pane to list the clues I have dropped in that scene. Once I've finished the first draft, I can open the project in Outline View and this will give me a bird's eye view and chronology of the clues that have been dropped.
Personally, I often also add background information that I dropped in the scene. I do this only because I have a tendency to forget whether I dropped that background information in the present novel or if my memory of dropping it is from the last novel I wrote!
This alone is a major reason why I love writing drafts in Scrivener.
CONCLUSION:
So these are the tips I would pass on about writing this first draft of a novel. Knowing that it's the hardest allows me to know that once I make it through this first draft, all subsequent layers of writing will be easy peasy compared to this one.
All I need to do is to blurt out the entire story in the first draft. All corrections, additions, deletes and polish will come in later layers.
I left off writing about how I divide the crime skeleton, after adding in the subplots, into the Four-Part Structure. I am now entering the third layer of writing. This blog post and video below are about sketching in the plot outlines.
WHERE WE ARE GOING:
Most new writers want to get to the writing already. But in this layer of writing, all plot holes or inconsistencies will show up. Any clues that won't work when adding more suspects and motivations will show up in this layer.
So this layer is like an insurance policy that you won't be writing for the trash can.
USING THE SHORT TEMPLATE:
My template is short but it keeps me on track. I'll break it down below. This small template I use keeps my writing on point and tight. It prevents me from meandering, dawdling, going off on an irrelevant tangent or writing myself into a corner.
POINT OF VIEW
n order to prevent head-hopping, which is very common among new writers, you need to be constantly reminded that each scene is in one perspective. Some writers write in first person and that's easy.
However, I write in third person - one persons perspective. This prevents the reader hopping from head to head. It's too confusing for a reader to do that.
However, I don't choose my point of view this early on in the process. I wait until I am actually writing the scene before I choose. In my experience, as you write the scene, the first draft, one character will sort of 'claim the scene as their own'. That's when I choose the point of view and then make sure the entire scene is in that persons perspective.
Now, I must confess, since I write in third person narrator style, I do allow myself one tiny head-hop at the end of a scene if I think it serves the plot well. I think any reader can handle one tiny head hop.
I'm a self-published author at this time, and one of the benefits of self-publishing is you can do what you want. The professional publishers may be horrified by allowing one head hop at the end of a scene, but as a self-publisher, I can do what I want. (Hee hee)
KEEPING TRACK OF TIME
I don't know whether I am an author who is obsessed with time, or whether I use time as an element to put pressure to solve on my characters, but I have always tracked time. I find this helps me balance the story and make the story more realistic.
What I mean by that is often times there is so much that is happening in a book on one particular day, that it becomes unrealistic that all of this could happen in one day. Maybe it's just me.
Keeping track of time allows me to also know when the workday is over and the subplots can enter the scene as most subplots happen at least in part in a character's off time.
CHOOSING A SCENE LOCATION:
Location is important for two reasons. One reason is casts the scene in cement. You have chosen a stage for the scene to take place. I don't write any scene or location descriptions in this layer of writing. But I can write the action of the scene in context of a location.
Secondly, adding the location in this layer allow me to go off and find photographs that I can use in the layers down the road where I will add descriptions into the story.
PURPOSE - MOVING THE STORY ALONG
Every experienced author who I listened to when I was first writing fiction said the same thing: Everything in the manuscript is there to move the story along. If it doesn't move the story, it doesn't belong there. So this Purpose in my template helps me keep my writing tight and on point.
CLUES - KEEP TRACK OF CLUES
vector magnifying glass
This one is self-evident. A crime novel, murder mystery or police procedural is about solving a crime or mystery. So uncovering clues, following them to the next clue is the vehicle for the story. So it's important to keep track of clues.
In the first stage of writing, it's easy to remember if you put clues into the story. In the first draft, it's easy to rely on your memory. But after you've read through the story a bit and begin to add more to it, you won't be able to remember whether you saw that clue in the last chapter or the last time you read through the entire layer.
So it's important to keep track of clues.
DIVIDING AND CONQUERING THE MANUSCRIPT:
By dividing the story into four parts, and then writing scene outlines, you can divide a huge manuscript down into bite-size pieces. It is less overwhelming and easier to organize, write and keep track of.
HOW SCENE OUTLINING WORKS IN SCRIVENER:
You can watch the video below for a full explanation, but each scene begins with the template. I leave the POV blank for now. I choose the time and location. And then under Purpose/Clues, I add everything I want to happen in this scene. I am thinking about the main plot, the dripping of background info, the dripping of clues, and the subplots.
I use numbers but using bullet points would probably be best as I have to change the numbers a lot. Although when I show you the rest of my technique, you will see that the number themselves don't matter.
ABOUT THE VIDEO:
In this video, I talk about and lay out how to use a simple template and write the individual scene outlines. By sketching in the individual novel scenes, I can be sure that the clues and mystery scenarios will all work before I waste any time writing any scenes. I go into my strategy and work flow in this video and the benefits of outlining the scenes first. Once you have a scene outline, the actual writing of the scenes becomes only creative and fun.
Time Stamps of this video: 00:01 - Laying out the plotline into scenes 00:58 - The benefits of writing scene outlines 02:46 - The scene template 03:03 - Summary of the process up to this point. Showing a scrolling outline. 04:22 - The template in action - an example of how the template works 04:45 - Point of View 05:26 - Keeping track of time in the manuscript 06:26 - The importance of Locations 07:10 - Purpose - Moving the story along 08:20 - Keeping track of clues 09:20 - Dividing and conquering the manuscript 10:05 - Live in Scrivener with present novel - How the scene outlines work. 11:45 - Sneak Peek of the Synopsis 12:05 - Looking at Scrivener Binders a new one vs. a fully written book 13:13 - Knowing the story through the outline
Use the Scene outlines to write the individual scenes.
Split Scrivener Binder into Four Parts representing the Four Part Structure.
I copy each scene outline into one document under the Part it belongs in.
I set up all of my scene documents in the proper sections. I don't worry if certain parts are 'heavy'. The clues are recorded but the rest of the drama of the story is not.
THE MIND IS ALWAYS WORKING:
This process will give you a bird's eye view of the scenes.
I usually decide to move a scene or two closer to the mid-section of the story. Because it's only an outline, it's easy-peasy.
By seeing the scenes with the timings and a one to three word prompt, I start to see the story from above.
I DON'T FORGET MY LANDMARKS - PART 1
The Hook (Which we haven't talked about yet)
The crime scene or the acknowledgement of the mystery
The Inciting Incident - When the detectives start off to solve the crime.
By the end of Part 1, I want there to be at least 2 suspects or even 3.
By the end of Part 1, more than one person looks guilty.
LANDMARKS OF PART 2:
Interviews begin - they point to different people
Clues begin to trickle in - they may seem to clear one or another
One of two secrets are exposed in Part 2.
The end of Part 2 is the midway point. There could be a big surprise or shock
LANDMARKS OF PART 3:
More interviews
More clues
Even the rise of another suspect, an unusual suspect.
This rise of an unusual suspect can twist the story into another direction.
This midway point could also be a Dark Night of the Soul where it may seem that the culprit may get away with it or it won't be solved or solved in time.
LANDMARKS OF PART 4:
The first part of this section will be a big reveal.
The crime will be solved between the start of Part 4 up to 2/3 of the part.
There needs to be time to wrap up the crime and show how it affects everyone involved.
The last part of the story is for the 'wrap up' where you tie up all the loose ends.
ABOUT WRITING THE WRAP UP:
Reveal the guilty party and solve the mystery.
Reveal why the red herring couldn't be guilty.
Do a quick review of the whole crime to confirm for the readers
Show a 'new normal' for the main characters, showing their character arcs completing.
In a series, you need to drop a clue that this crime is finished but their story continues.
TIPS ON WRITING A FIRST DRAFT:
Write forward only. Don't look back.
Don't worry about spelling, grammar, verb tense, too many over-used words.
The goal of the first draft is to get it down on paper and make sure you put everything into the story from your scene outlines.
Think of it as 'blurting out the story'.
I'LL BE BUSY OVER THE NEXT FEW WEEKS WRITING:
I've reached Layer 4 in my present novel. This layer takes time to get it all down on paper.
By not worrying about prose or grammar, I'm free to just be creative about the story and whatever dialogue pops into my head.
The first draft will be just that -- a first draft.
Rest assured that the first draft is important, but by the time I get all the way to Layer 8, it will be polished and not look anything like it looks in the first draft.
I HOPE THIS SPURS SHARING
I hope my revelations of my writing techniques will prompt other authors to reveal their process.
I love to learn new techniques and when I was brand new, learning from experienced authors was so very helpful.
Here is the YouTube video that goes along with this blog post. I have the timestamps below in case you want to watch a certain part over or just skip to the relevant part.
00:01 - How I set up Scrivener into the Four Part Story Structure 01:15 - This process gives you a bird's eye view of the entire story
02:00 - Showing in Scrivener how I set up the Binder, the documents, the Title and Synopsis sections and how I can use the Outline view to see a bird's eye view of the entire manuscript as it comes together.
03:00 - Tracking case time and personal time in order to weave in the subplots
03:36 - How I use the screen outlines, moving the scene outline into the Notes section to keep it safe
04:25 - The Corkboard vs. Outline View 06:10 - Keeping the writing landmarks of Part 1 in mind: The hook, inciting incident, etc.
07:15 - Landmarks of Part 2, how the evidence trickles in - middle of the book
08:20 - Landmarks of Part 3 - Names the suspects and a dark night of the soul.
09:20 - First half of Part 4 - The big reveal and the wrap up of the mystery. 11:03 - Tying up all loose ends and the subplots. Showing the new normal. Ending the character arcs for this story.
12:00 - Writing series and letting the reader know the crime has been solved but their personal lives continue.
12:37 - Five tips to Beginner Writers 13:30 - The story crafter vs. the story author.
This is the second step in writing a new fiction novel. In the first step, I start out with writing four potential storylines in FreeMind, which is a mind mapping software. You can see that video here.
Once I finish four potential plotlines, one of them usually pops out and wants to be written. I feel myself getting excited to write it. This process, although it's hard to think of four different storylines, gives me confidence right from the beginning that I am writing the best book for me right now. This whole process fills me with excitement to write.
OPEN SCRIVENER AND BEGIN:
I take my new plotline and open scrivener. I open one document and plan the crime itself. I'm presently writing a police procedural at this time, but even if you are writing a generic mystery, this technique will work. Most great fiction has some level of mystery or suspense in it, so it would even work for generic fiction.
I make a chronological list of the crime as it happens. When it happens, who it happens to, who the first witnesses will be, if any. I also isolate in my mind an actual scene of the crime. I put in all the evidence the cops or detectives will find at the scene. This will begin the investigation. In a mystery or crime novel, this is the inciting incident.
I also add to the list other suspects and what their motivation will be for the crime or mystery. As you begin to add different suspects into the mix, you will most likely have to change your original plotline idea to accommodate these new suspects.
I go through this whole process adding, subtracting and changing up the suspects and plotline in this abbreviated format. It should look like directions from Google maps or a long list of very short paragraphs.
A SECTION CALLED THE ENDING:
I have a section at the end called "How it will end". My books never end the way I indicate in this section. However, by having a solid idea of how I want it to end at this time, it gives me a direction and a destination. Then during the creative process, when I get new and better ideas, I simple go down my list and/or scene outlines (we'll cover these in another installment) and change up the outline. It's easy-peasy.
I do this for the entire storyline. At the end, you will have a good idea what the story is about, but there won't be any nuance, or personality in the story yet, so if it seems dry, don't worry about it. It is very dry at this point. You are knitting together a skeleton and bones are dry. You will breathe live into this as you get to the point of actual writing.
THE BENEFITS OF WRITING THIS OUTLINE:
Most new writers want to start writing scenes and dialogue. They want to just get on with it. But the dark side of working this way is that when you find out your clues won't work when you need to add a new suspect, you will have written two chapters already. My process will save you from writing for the trashcan.
By going through this short one-liner outline in chronological order, anything in the story that won't work, it comes out in this layer of writing. This saves you from throwing away already written work.
There is a video I made for YouTube below. I go over some of these points but others tips and tricks as well. For your convenience, I have time stamps below in case you want to just jump to the section you want to look at:
01:27 - Open Scrivener and open one document 01:45 - Other suspects, their motivation, red herring, etc. 02:15 - How it will End section 03:20 - Determining the framework of the script which will prevent writing for the trash can. 05:30 - Review of the layer elements 05:43 - Sneak peek into the next videos
John Walsh is a successful funeral director with a loving family but he has a weakness for other women. The modern world thinks cheating is a victimless crime, but is it?

 When you sit down to outline your story before you write a single scene, something shifts. You stop thinking like a writer and start thinking like a builder. That's the whole point.
 The Brainstorming Hat — This is the first hat, and it's the loose one. You wear it when you're sketching out a few possible storylines, just to see which one has legs. This is quick work — short, messy ideas, not finished plots. The goal isn't to pick "the" story yet. The goal is to make sure whatever story you commit to actually has enough potential for twists, turns, and a full novel's worth of trouble. Don't skip this hat. Committing too early is how writers end up 40,000 words into a story that runs out of gas.
 The Story Engineer Hat — Once you've picked your storyline, this hat goes on. This is where you lay out the bones of the story — what happens, in what order, and why. You can do this with short paragraphs, a bulleted list, index cards, whatever gets the structure out of your head and onto something you can look at. It won't be pretty. It's not supposed to be. This is the layer where you make sure the story actually holds together before you build anything on top of it.
 The Location Scout Hat — This one comes after your story has taken shape in the engineering stage. Now you go looking for the places where all of this is going to happen. Where does the crime scene sit? What's down the street? What does the neighborhood look like? Putting in a little effort here pays off twice — it makes your story feel grounded and real, and if you've ever thought about your book being adapted for film or streaming, having real, scoutable locations gives you a head start.


 This blog post will be a peek behind the author workflow in Layer 5 of my Novel Writing in Layers Series. I am writing Book 6, Majestic Landings, in my police procedural series, Jack Nolan Detective Series.
 1. Making sure the scenes line up and flow smoothing and fill in the Synopsis box if I forgot to do it in Layer 4. I have a snapshot of the Synopsis box to the right or below. This allows me to look at my work in the Outline Mode where I can see the novel from a bird's eye view.


 There are many blog posts and videos on the internet about how to write a novel. Much of the advice is general in nature and only broad-stroke tips. This video seeks to go one step further and open my last book, which is still being proofread in Layer 8, and show a work-flow demonstration.
 I am in the process of finishing my 14th novel. I started out like many of you as a self-taught author who took in unorganized, uncurricularized information and had to make sense of it all. I devised this 8 Layer system to try to write a novel as efficiently as was possible. I offer it to you for whatever weight you wish to give it.
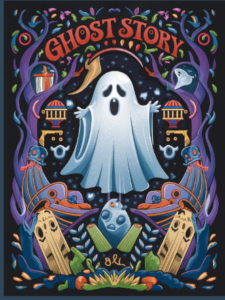 1. Who is the Ghost? Why has the Ghost arisen? Why is the Person not Resting in Peace? What is the Ghost's purpose for appearing? This is the backstory that will be dropped like breadcrumbs throughout the storyline. (Ghost-Story.png)
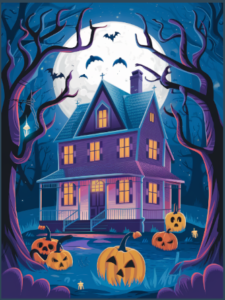 1. What is it about the house that's creepy?
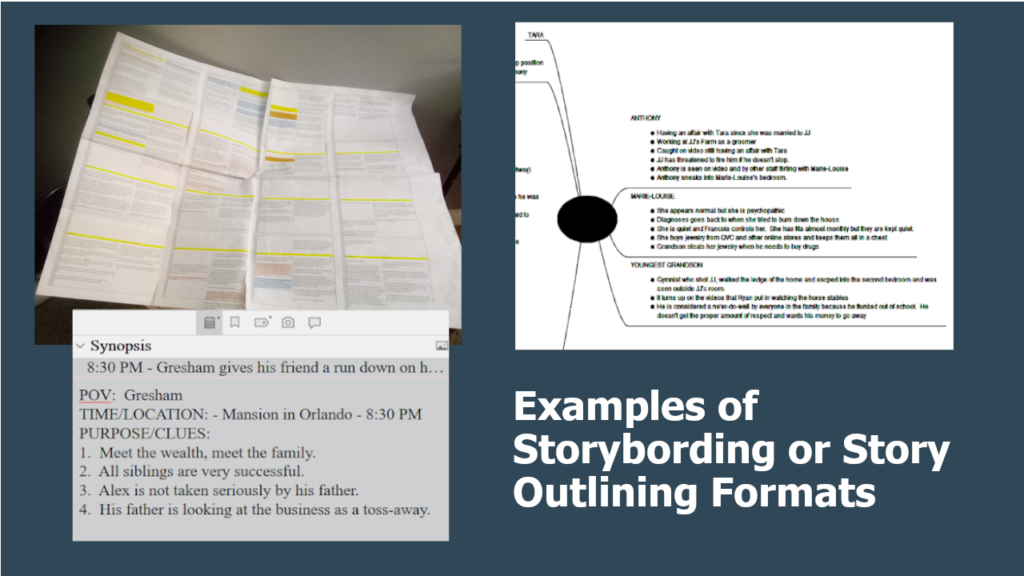
 It may help to think of yourself as more of a Town Crier.
 1. Using the read aloud feature in Microsoft Word, I read the book aloud as I read along with it. This gives you an idea of how the book will sound in the reader's mind.
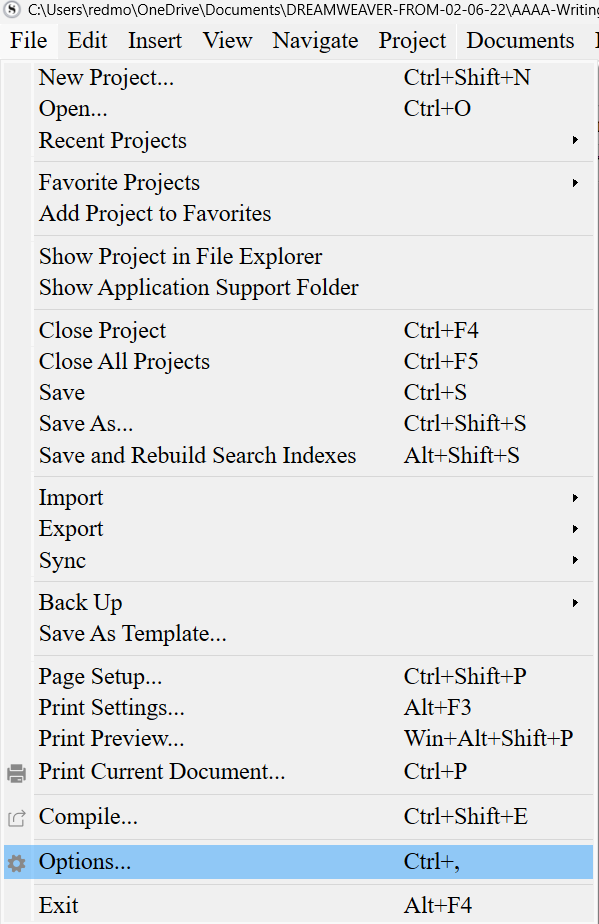
 Although I follow a detailed outline of the story before I even start writing, each novel presents its own issues and/or problems. In this novel, I had several timelines I had to keep straight.
 The second thing I do in Layer 5 is to fill out the Synopsis section. This section is in the upper right-hand side of the Scrivener platform.
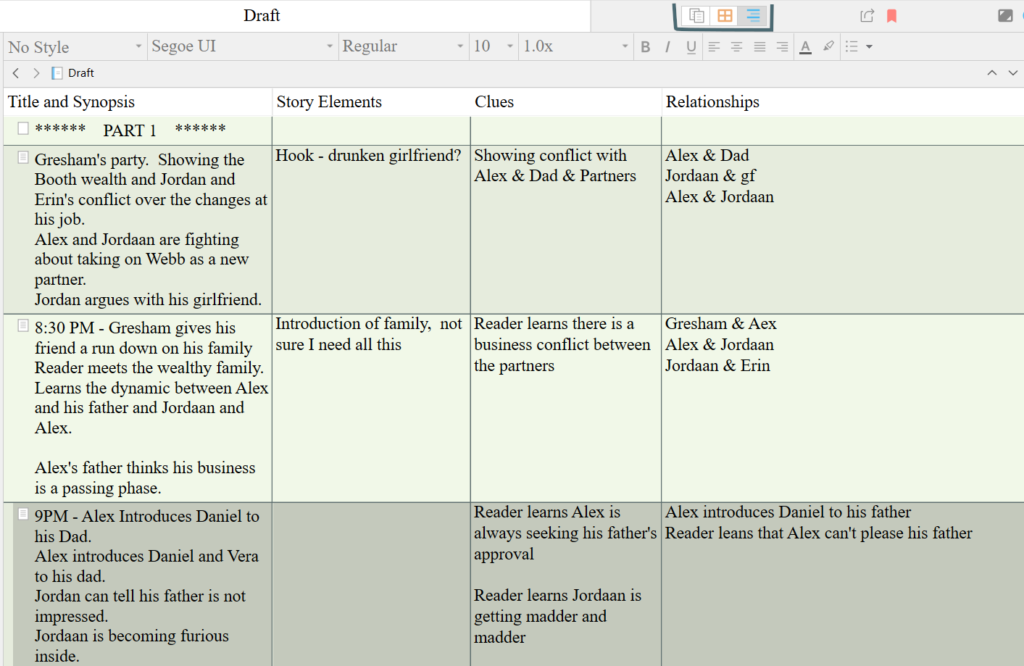
 Now, because I had to kind of abandon the full subplot in Layer 4, I will be finishing the subplot while I'm doing the descriptions and the synopsis box. Once I'm done with this layer, then I'll be back to discuss what happens in Layer 6!
 Turn these Scrivener features off, especially if you plan to move your finished novel draft into Microsoft Word for final formatting. Because I self-publish and I need to upload in ePub and PDF manuscript, I use Word for a final proofread and formatting. I find Word is the best choice for me. The smart quotes do not translate well between Scrivener and Word. If you turn off the smart quotes, Scrivener will replace them with straight quotes and these translate better.
 I'm writing my fourth novel in the Jack Nolan Detective Series. The book is still unnamed. This is Level 4 in my Eight Levels of Writing a Novel series. This first draft is down and dirty. It is the hardest lift of the entire project. At least for me, the first draft is the hardest. The characters all seem like stick figures. I find them unlikeable -- even if I liked them in the last book! Any humor doesn't seem to work. Everything just seems awkward. I have to literally force myself to keep typing. So this tip is to just keep writing. Don't check on any spellings or grammar. Don't even look back. Just keep going until you have the crime down, the main plotline down and the subplots at least in place. That will complete the first down-and-dirty draft. Every other layer will be easy compared to this one.
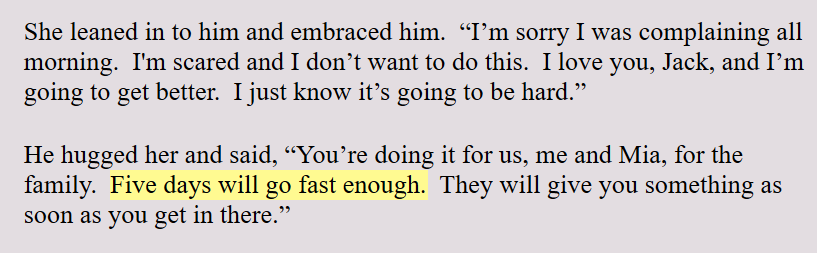 Scrivener allows you to highlight text in any color you want. I use this highlighter in the Level 4 Draft to make a mental note to myself to check on things. For example: If I say that someone is coming home from a hospital in four days, I highlight this. This makes sure that this lines up with the plotline, or the crime line, or the subplot lines.
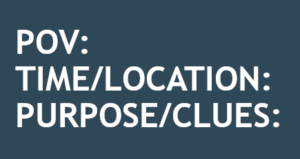 Like I mentioned earlier, I'm in the first draft of my novel and each scene begins with the same Scene Template as seen to the left.
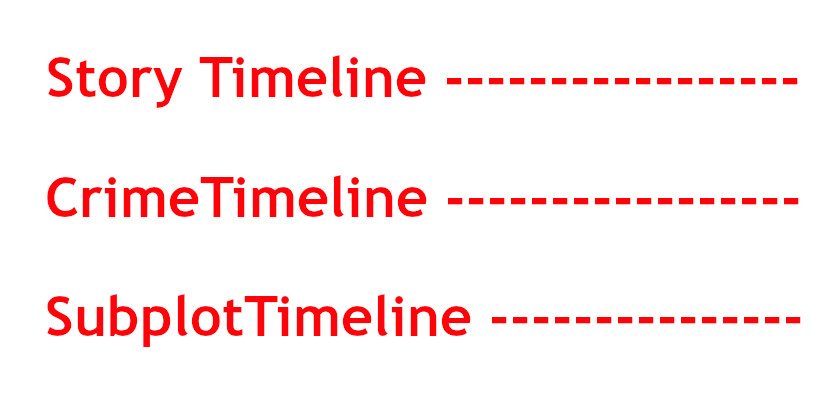
 When writing the first draft, I use the Scrivener Synopsis section in the Inspector Pane to list the clues I have dropped in that scene. Once I've finished the first draft, I can open the project in Outline View and this will give me a bird's eye view and chronology of the clues that have been dropped.
 Most new writers want to get to the writing already. But in this layer of writing, all plot holes or inconsistencies will show up. Any clues that won't work when adding more suspects and motivations will show up in this layer.
 n order to prevent head-hopping, which is very common among new writers, you need to be constantly reminded that each scene is in one perspective. Some writers write in first person and that's easy.
 I don't know whether I am an author who is obsessed with time, or whether I use time as an element to put pressure to solve on my characters, but I have always tracked time. I find this helps me balance the story and make the story more realistic.
 Location is important for two reasons. One reason is casts the scene in cement. You have chosen a stage for the scene to take place. I don't write any scene or location descriptions in this layer of writing. But I can write the action of the scene in context of a location.


 Write forward only. Don't look back.
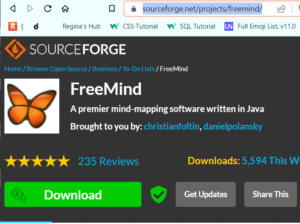 This is the second step in writing a new fiction novel. In the first step, I start out with writing four potential storylines in FreeMind, which is a mind mapping software.
  Most new writers want to start writing scenes and dialogue. They want to just get on with it. But the dark side of working this way is that when you find out your clues won't work when you need to add a new suspect, you will have written two chapters already. My process will save you from writing for the trashcan.