
QUICK REFRESHER OF WHAT I DID IN LAYER 7:
Just as a refresher, in Layer 7, this was a long and tedious proofread. Using my list of troublesome words, I searched out all of them all throughout the manuscript and made corrections, deletions or additions.
This technique breaks up the proofread into different formats. By doing this, it prevents me from just "reading over" all of my mistakes, which is too easy to do as the author.
WHAT HAPPENS IN LAYER 8:
 In Layer 8, I do a read-back. In Microsoft Word, I use the Read-Aloud feature that is contained on the Review Tab. By listening to the book read aloud by someone else, it doesn't skip over mistakes like I do as the author. By the time I'm finished with Layer 7, I've read and reread this book too many times to trust my eyes to spot every error.
The Readback:
I listen to every word during the readback. In this layer, I not only catch whatever misuse of words escaped my view in the last layers, but I also choose to change a sentence or two based on how it sounds. Many readers repeat every word in their heads, so if a sentence is back-to-back with one that makes it hard to say or understand, I rewrite it to correct that problem.
After Layer 7, I always feel that the book is picture perfect -- but I find at least several words or areas that I choose to change. I read-aloud the entire book.


SCREEN SHOTS ARE FROM MICROSOFT WORD
CREATING THE TABLE OF CONTENTS
The last thing I do is create the Table of Contents which I will explain here, but you can see done live in the video below.
While the manuscript is open in Microsoft Word, click on the References Tab. Select Table of Contents. Choose Custom Table of Contents. (Picture on left above)
Once the next dialogue box opens (Picture on right above), uncheck both boxes under show page numbers. I reduce the headings number from the default of 3 to 1. This is because I only use Heading 1 for my Chapter Headings.
This is all you need to do before clicking OK, which will produce the Table of Contents for an eBook.
IF YOU NEED TO CHANGE OR MODIFY THE FONTS OR SPACING, ETC:
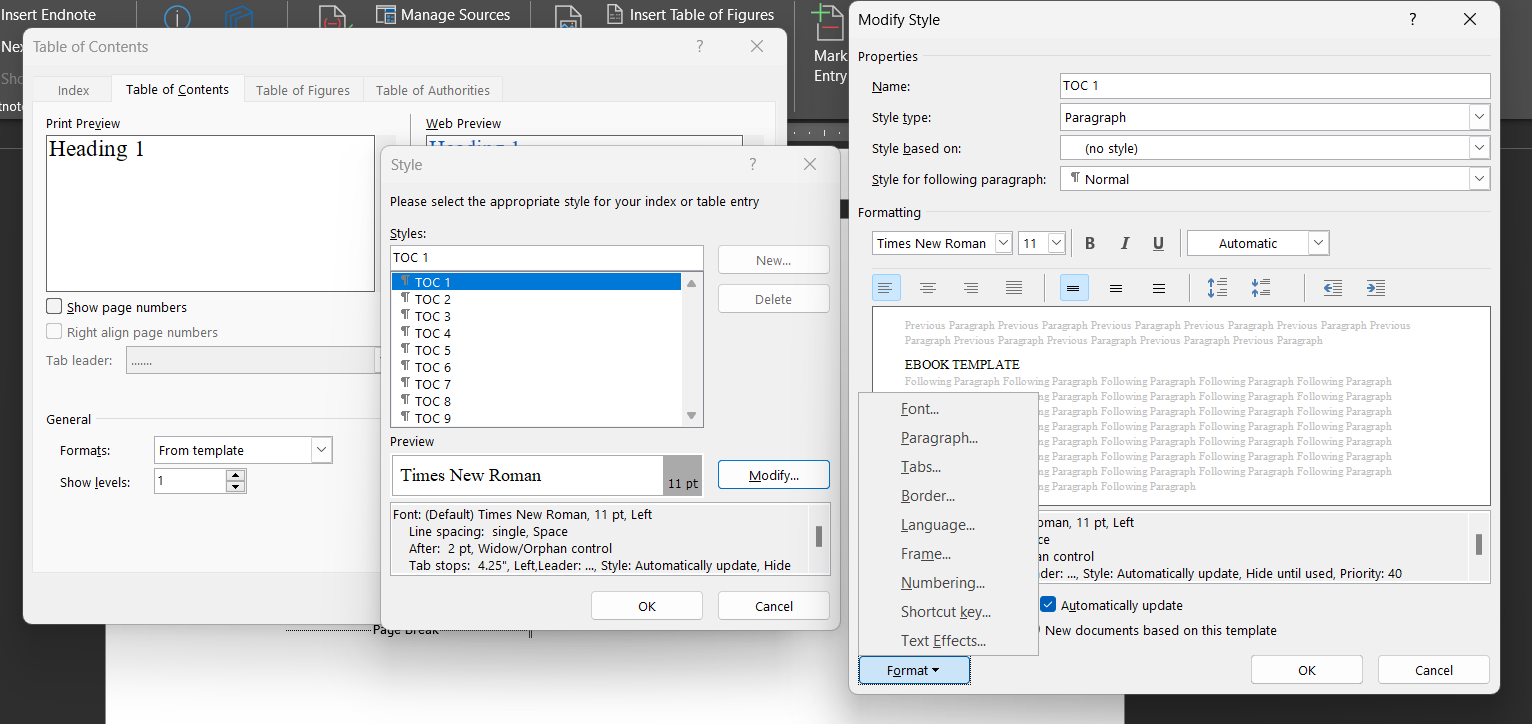
The picture above is where you change any or all of the settings. The dialogue box in the middle comes up when you click on modify in the first dialogue box. This is where you can change the font family and/or the font size.
This would be useful if you have a short TOC and want to fill the page; you can increase the font. Likewise, if you have only one or two lines of the TOC that spill over to the next page and you want to fit it onto one page, you can reduce the font size or change the spacing on the third dialogue box (that opens if you click on modify in the second dialogue box). You can alter the spaces before and after the paragraphs and this will help you add or subtract space.
IMPORTANT: Be aware, that once you click on the first modify choice in the first dialogue box (on the left), when you click out of this, Microsoft word will -- on its own -- recheck the boxes asking for page numbers. So if you modify anything, you will need to uncheck the page number boxes again! This can reek havoc with beginners! I'm talking from experience.
Once you "Okay" to close all of the dialogue boxes, the last okay will set off Word to create your Table of Contents.
THE EBOOK IS OFF TO THE EDITOR:
At this point, the eBook is now ready to go off to the line-editor. Because I have taken the time and made the effort to give my book a thorough proofreading, the editor won't be spending time on correcting silly mistakes I should have found on my own. She will be focused on my prose and how things look and sound. That's what I want her focused on.
If you take the attitude that "why bother with all the proofreading, it's going off to the editor?" -- you may wind up with a book that comes back merely proofread with very little line editing. At the end of the day, you are paying for an editor's time as well as their expertise. So my advice to beginners is to do all of the proofreading so you get more line-editing, which is what you want.
HERE'S A VIDEO ON THIS SAME MATERIAL:
Writing a Novel in Layers:
First - A Little About the Chronology of a Crime
Writing a Novel - Layer 1
Writing a Novel - Layer 2
Writing a Novel - Layer 3
Writing a Novel - Layer 4
Writing a Novel - Layer 5
Writing a Novel - Layer 6
Writing a Novel - Layer 7
Writing a Novel - Layer 8