Writing in Scrivener – Page 2 – Read First Chapter.com

Scrivener Tip – Long and Short Lists of Keyboard Shortcuts

Long List of Scrivener Keyboard Shortcuts:

I made the four-page list of Scrivener shortcuts into a gif to give you an idea of how many keyboard shortcuts there are.  Why make lists of them?  These came in handy for me because until I made my own theme in Scrivener, I had to strain to see a lot.  The default coloring of Scrivener is so white and bright that it made seeing the gray fonts very hard -- at least on my aging eyes!

We each have our own methods of doing things, and only a few of these shortcuts may become your favorites.  But it will come in handy as you get more and more productive as a writer.  Which will happen.  The one thing Scrivener does is streamline writing and allow you to power focus on your project.

Below is a moving gif to give you an idea of what the list looks like.  I got this information from a website called How to Scrivener.  I don't have to tell you this is only one of the many resources he has for Scrivener users.


HOW TO USE THE SCRIVENER LIST:

I simply copied and pasted them into a Word document and printed it out.  I keep it on my right hand side and one by one, I just chose a new shortcut to focus on that session.  Little by little, they became natural.  I no longer need to refer to the list anymore.

PASSING IT ON:

I'm passing this on to new authors as so many other authors passed on their tips and tricks to me.  I hope this helps someone.

In case you don't want to copy and past your own document, you can click below to print out my copy.  Be sure to visit How to Scrivener to see all of the various resources he/she has for Scrivener users.

DOWNLOAD KEYBOARD SHORTCUT LIST


Writers Tip – Initial Proofreading in Scrivener – Part 2

PROOFREADING WHILE STILL IN SCRIVENER - PART 2:

Once my novel is now in Chapters and I have proofread it while still in Scrivener, I mark each of the scenes that have exciting events, vampiric events, even humor, to make sure the story is balanced and has events and surprised all throughout the story.  Some books I read sag in the middle as everything is gearing up for a big bang at the end.

I like to sprinkle the books with enough to hold everyone's interest.  At least that's what I'm trying to do!

I will be starting  a new novel soon, and at that point, I will make a video showing this marking of the novel for a greater overview of all that is happening.

COMPILE IN SCRIVENER AND SAVE IN WORD – Name the Document "First Draft of BOOK TITLE".

PROOFREADING IS NOW DONE IN WORD:

  1. Do an initial spellcheck in word to eliminate any and all errors you may have missed in Scrivener.
  2. Search for your usual mistakes.  Below are an example of mine:
  • Awhile (a while)
  • going to (clean up verb tense)
  • it's (or its? - check)
  • draw (drawer)
  • beginning to (check for verb tense)
  • in order to (check for verb tense)
  • going to (check for verb tense)
  • starting (check for verb tense)
  • Okay (how many times it’s used)
  • Just (how many times it's used)
  • Really (How many times it's used)
  • Very (Find a better descriptive word)
  • ." said (check glitch from auto correct)
  • ." whispered (check glitch from auto correct)
  • and all ly words
  • Search all quotes to check for opening and closing quotes.
  • Word spell check and Word grammar check.


SEARCH OUT A PROFESSIONAL EDITOR:

The one thing I need to spend money on is a line editor.  I felt comfortable enough with the plot and character development in my own stories, so I limited myself to a line editor.  They go over your work looking for grammar mistakes, confusion in the story, plot holes, any glaring mistakes.

I did a hard proofread on my work before passing it off, so the editor didn't waste time correcting typos and things like this.  So the better your ebook is, the more real pointers they will do for you.

The hard proofread ends with having the eBook read back to me by the AI reader in Word (Review tab) or NaturalReader.com which is a text to voice online reader.  This is a great way to find mistakes you are reading over because you are too familiar with the work!

DURING THE EDITING PROCESS:

Put your eBook away for a week.  This will allow your mind to refresh for the work that's ahead.  If you will be doing Advance Review Copies for your launch, get prepared to find Review readers.

I found two professional Beta Readers and Proofreaders on Fiverr.  They read the book, found several typos and punctuation mistakes, and gave me amazing feedback.

Other Text to Voice tools:  Grammerly, Ginger, PaperRater, Reverso Speller, NounPlus, After the Deadline

CLICK HERE TO DOWNLOAD A CHEAT SHEET WITH THIS INFO:


Writers Tip – Initial Proofreading in Scrivener – Part 1

PROOFREADING WHILE STILL IN SCRIVENER:

There are two levels of proofreading.  The first level is proofreading for plot context to make sure the novel is complete.  Before I leave Scrivener, I go over the different chapters and scenes and mark the following beats and make sure that everything is included.

Before I post the checklist, I need to say that I did not invent these ideas below.  I have been listening to videos by other authors for several years now and I have taken copious notes and somewhere along the way I took a little from one author and a little from another.   I think them all for their generosity in sharing their experience and knowhow.

  1. Proofread and make sure you indicate where the following items are
    a. The Hook  - This is the thing or the event that will hook the reader's interest.
    b. The Setup - This includes the setting where the story will take place.  It also includes an introduction to the main protagonist/hero and what his or her wants or needs are in life, so to speak.  This is the starting point of the quest.  (The Quest)
    c. Identify the subplot.  Be clear on how the subplot affects the plot.
    d. Inciting incident - This is the point where the story has it's first twist or turn.  The Hero is pulled into a quest that he starts out not really wanting to go on.  This is going in a different direction than "the setting".
    e. Setback(s):  Depending upon what type of novel you are writing, you will have one or more setbacks that create conflict and drama that move the story forward.  You may want to clearly mark these as well.
    f.  Major setback:  about 75% of the way through the book, the big setback happens when things look like they are not going to work out.
    g. The final battle/The Climax - In high suspense novels, this can be a physical battle for life and death.  In a less dramatic story, this is where the hero has to conquer himself or herself in order to be able to pull off their quest.
    h. All is lost - Right before the Hero gets their second wind and has a breakthrough, they will have a moment of despair where all will seem lost.
    i. The glorious/surprise ending - Hero wins/gets what they want
    j. The aftermath - 99% point of the story - This is where the story wraps up and you see the "new normal" now that the hero has broken through their fears and saved things.
  2.  Check the following about the subplot:
    k. "Subplot Development" - any crisis, suspense, etc.
    l. Any plot twists or pathway turns for the subplot
    m. Point out where subplot reaches high tension
    n. Point out where the subplot is setback or fails, or feels at a standstill
    o. Scene that resolves the whole story
  3. Make a document to check your background and descriptions
    p. Make sure you don't repeat information in multiple places.  Make a separate sheet and record which chapters your descriptions and background info is at.  This way you can make sure you have included everything and also make sure you haven't repeated anything.
    q. For the series books, make sure you include enough background
    for it to be a stand-alone book.

CLICK HERE TO DOWNLOAD A CHEAT SHEET WITH THIS INFO:


Writers Tip – Keeping Track of Background Info

DON'T TRUST ONLY YOUR MEMORY:

Authors-Tip-tracking-background-info

Reading through the first draft of my first novel, I realized that I had repeated background information up to three times!  I had no idea I was doing this until I was already done writing the draft.  Although Scrivener, which is a software tool for authors, has lots of tips, tricks and gadgets that are designed to help authors in every stage of writing, there was no way to check background info that was designed into the software.

What I learned the hard way was that I cannot trust  my memory on what information I have written into the story.  After my 8th novel, I have now devised a strategy that helps me eliminate that problem and am passing it on.

I make up a separate document inside scrivener where I track this background and descriptive information.  Or if you are old school, you can write a list in pen and paper keeping track of the information as you add it into the book.


HOW I KEEP TRACK OF BACKGROUND INFORMATION:

Technique 1:  Keep Track of Background and Descriptions As You Write:

The first one is to keep a separate document with a table containing 2 columns.  The left column has a notation regarding the background information or character description.  The right column, I put in what chapter I have that information in.

TABLE DOCUMENT EXAMPLE:

Background & Descriptions Chapter Number
Physical description of Hero Chapter 1
Description of job history Chapter 4
Reference to past case (for series info) Chapter 10

The only drawback to this technique is interrupting the creative process.  I was stopping while writing to record the background info, etc.  I did this for a while, but that's when I found Technique 2 which I describe below.  That one worked better for me.  You can pick which one you would like better.

Because I work with a plot outline, I write the entire story going from scene to scene to scene in Scrivener.  I write using Day 1, Day 2, etc. instead of Chapters.  This allows me to carefully watch my storyline and timeline together.   Like I said above, I write the first draft and never look back.  (You see how I like to repeat things!)  I only re-read in order to "get my bearings" between writing sessions.

Technique 2:  Begin Tracking Background after first Draft:

I stopped interrupting myself during the draft writing stage and paid no real mind to the background and descriptions.  I added them as I was writing and kept moving.  Then, after the draft is done, I shift into reading for context, to make sure the story is all there and all the dots connect.

This is the point where I begin tracking and checking on the background and descriptive info.  This is the point where I made the table document and begin tracking the background and descriptions.  If I have repeated something -- and I always do -- I remove it in one of the chapters.

This way, you can keep track of all of the background and other crucial info that you need to track.  By putting it off until after the draft is finished, you prevent yourself from having to stop the creative writing process.

This is the technique I use now all the time.  I wait until I've even set up with Chapters and I'm reading for context.  That's where I start checking on the descriptions and background info and anything else I want to keep my eye out for.  Any repetition comes out easily in this stage.

WRITING A SERIES BACKGROUND:

This same technique works with writing a series.  I write each book as a stand-alone as well as being a numbered book in the series.  This means I have to include background information as well as series information in each of the novels, without spoiling the surprise if they read the novels out of order.  Some surprises can't be helped, but some can be hidden.

I make a list of all of the facts and background information the reader of Book 4 would need to read the stand-alone in context.  I print out this list and as I begin to read through the novel for context (after the draft is done), that's when I check off and make sure all of the needed information has been included throughout the book.


Scrivener Tips for Beginner Authors

PLOTTING IN EXCEL:

novel-plotting-sheet

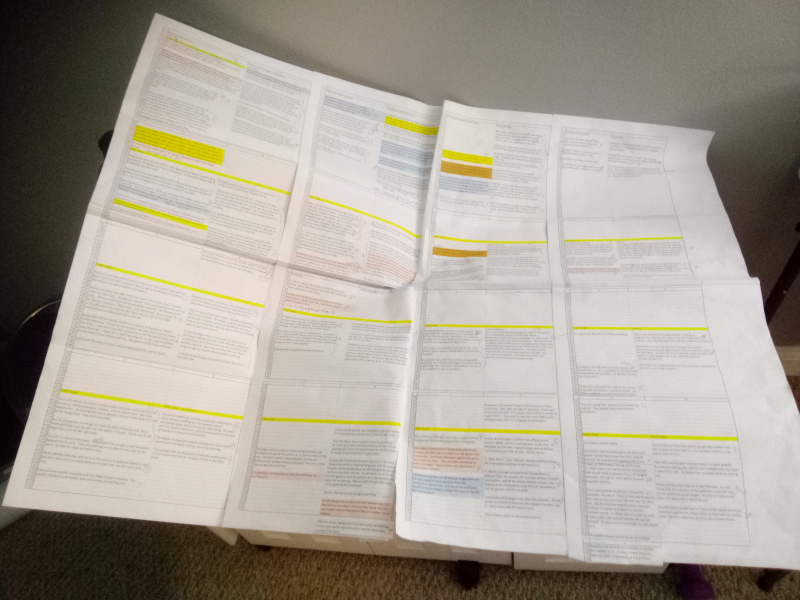
My plotting is done in Excel and then highlighted and taped together so I can see a bird's-eye-view of the entire story.   After I have a working plot, I then go to Scrivener to begin writing the story.

FROM PLOTTING TO FIRST DRAFT

The video below is one that gives a new novelist, a true beginner, some tips that can help you with organizing your writing and keeping track of clues, background drops, character relationships and more.  This system can be customized to whatever you as a new author needs in terms of tracking.   For example, in my first novel, Groomed for Marriage, I dropped most background at least twice, and sometimes three times!  That's how I came up with a way to be able to keep track of it in it's own section in Scrivener.

I hope you enjoy the video.  If you have any suggestions for future videos about scrivener or anything else about "new authors", leave it below and I'll check it out.


Scrivener – Setting Up the Project Settings-Options – 2

scrivener-new-project-emptyScrivener comes with certain default settings.  Most of them are fine, as is, but you may want to change the font of certain items and things to make working in the project more comfortable.

For example, I prefer Times New Roman size 16 or 18 px.  I find when writing, this causes much less eye strain.  When the project gets closer to finished, I can go back and change the “compile” settings to Times New Roman 12px for actual upload to KDP.Amazon.com or for upload to a paperback template.

SETTING UP THE PROJECT SETTINGS/OPTIONS:

scrivener-meta-data-project-properties-db

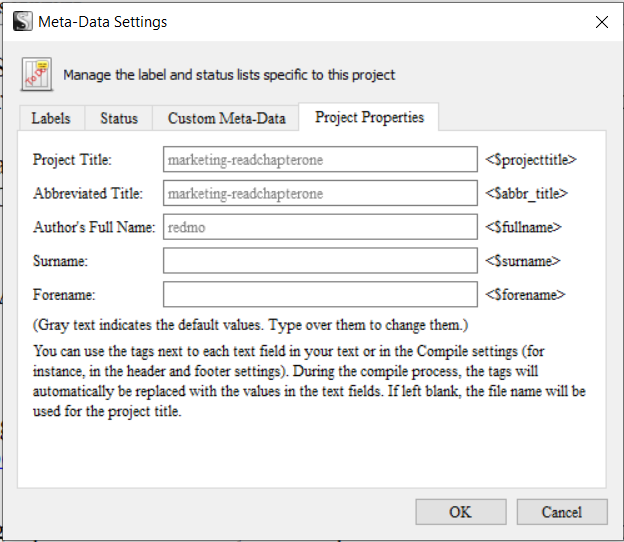
The graphic above is where you need to be in order to change the Project Properties.  How to get there?  Click on Document => Meta-Data Settings => Project Properties Tab.  This will bring up the screen above.

Project Title will be one you fill in as well as Project Abbreviated Title.  For example:  The first book in my series is called Groomed for Marriage.  So I would fill in Groomed for Marriage in the top box and then for abbreviated, I would fill in Groomed.  You can also fill in your full author name, and then the last two boxes are to put in the first and last names separately.  This information is where the project will pull the Book Name and Author Name from.

I ignore the labels section and I don’t work with draft vs. final copy, I just work in a draft until I’m ready to compile.  So if you are a newbie, just leave those settings as is.

We will be addressing the Custom Meta-Data, but it will be more understandable later in the instructions.

scroll-black-scroll-on-trans

COMPILE OPTIONS AND SETUP:

scrivener-compile-first-screen

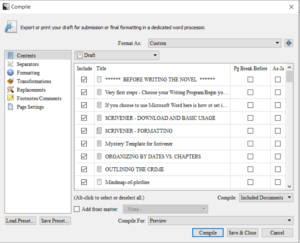
Click on File => Compile to get the dialog box pictured above.  This box allows you to make lots of changes.  I will start with a list of them and a brief discussion of what they change.

CONTENT:  This tells the Project what to include in your project and whether to follow other formatting instructions or upload/print as is.  So as a newbie, you won’t have much that shows up in this box until you start actually creating new files, so you can leave them as seen in the graphic above.  These settings will serve you well as a new scrivener user.

SEPARATORS:  This allows you to add a pound sign or you can add a few pound signs.  My advice for newbies is to remove this as it can get very tricky as you are working to have separators being automatically put in because you will be making many, many changes to your book and you don’t want to worry about having to remember to take these out or add them.  So until you get ready to upload to KDP.amazon.com or deliver to a publisher, do yourself a favor and forget the separators.

FORMATING:  This formatting can get very tricky.  I’ll try to explain this in the simplest terms.  This area tells Scrivener where it will be pulling it’s files from.  Just make sure “text” is selected in the second and third lines”.  You won’t need to know anything else for right now, but if you want a better explanation, the scrivener user in this video makes it very understandable:

TRANSFORMATIONS: – Ignore this
REPLACEMENTS: – Ignore this for now
FOOT NOTES/COMMENTS: – If you will be adding footnotes and/or comments, you will need to fill out these options.
PAGE SETTINGS:  These have to do with your headers and things, so you can work with the defaults, but this is also covered in the video below.

Next we will cover changing the “Tool Options”.

Scrivener – Opening a New Project 1

scrivener-iconSo now you have downloaded Scrivener , it’s time to talk about how to create a project.  Whether you are using Scrivener to write an eBook, a novel or keeping track of your blog posts, everything begins as a new project.

Once you double-click on the Scrivener icon, it will open up the program in a neutral state if you have not created a project yet, or it may, by default, open your last project.  I would suggest leaving this setting as is, because you will tend to work on one project for awhile and it makes things easier when it open to where you left off.
scrivener-new-project-pane

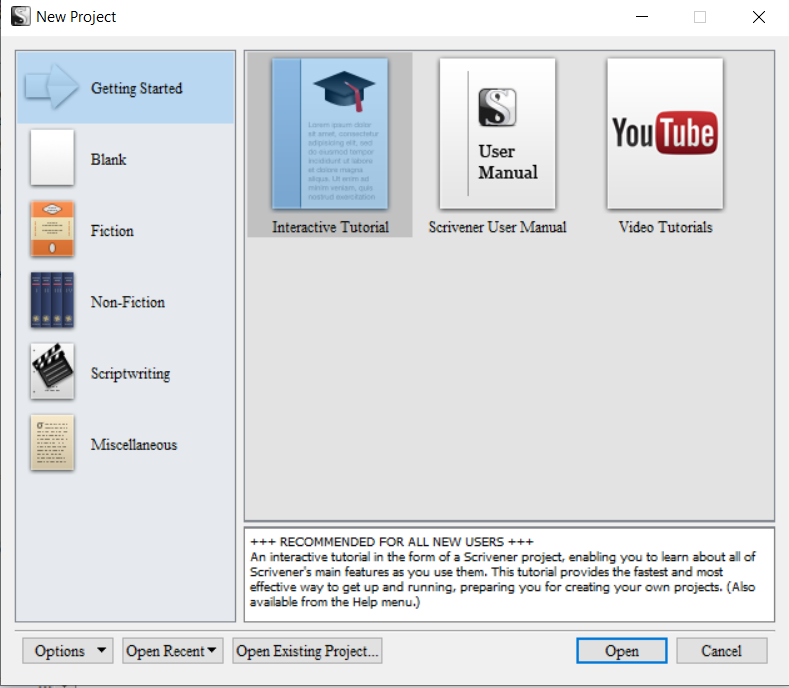
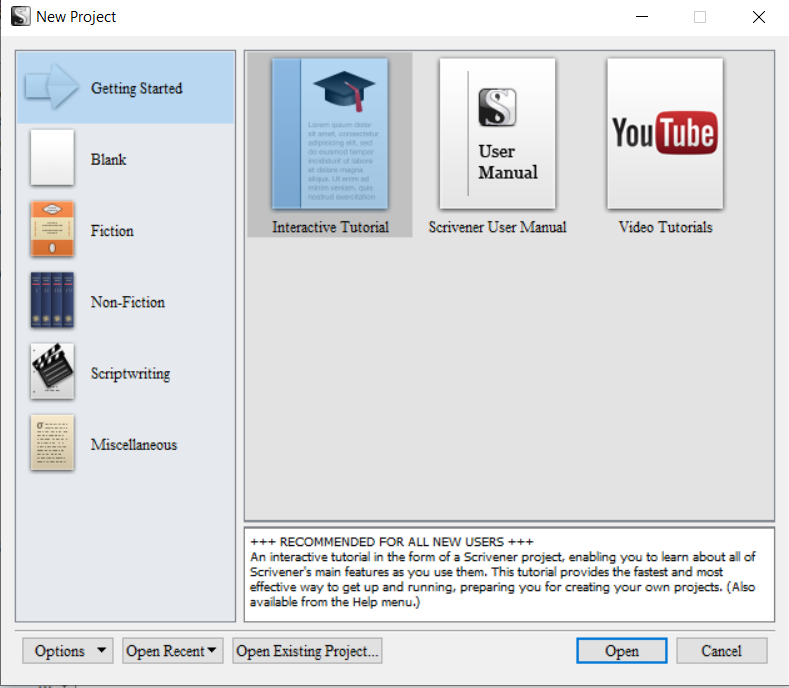
I suggest you open a Blank project rather than opening one of the templates. and let me explain why.  As a newbie, I selected the fiction book and wound up having to fight against everything that was put into the folders.  It made things all the more confusing.

It had a folder called “front matters” that I never heard of before.  I know what front matters is today, but I still prefer to set things up my own way.  So to keep it simple, just open a Blank project.  That selection is in the left-hand column.

In order to get the dialog box above, click on File => New Project.  This dialog box opens, and then you select Blank.

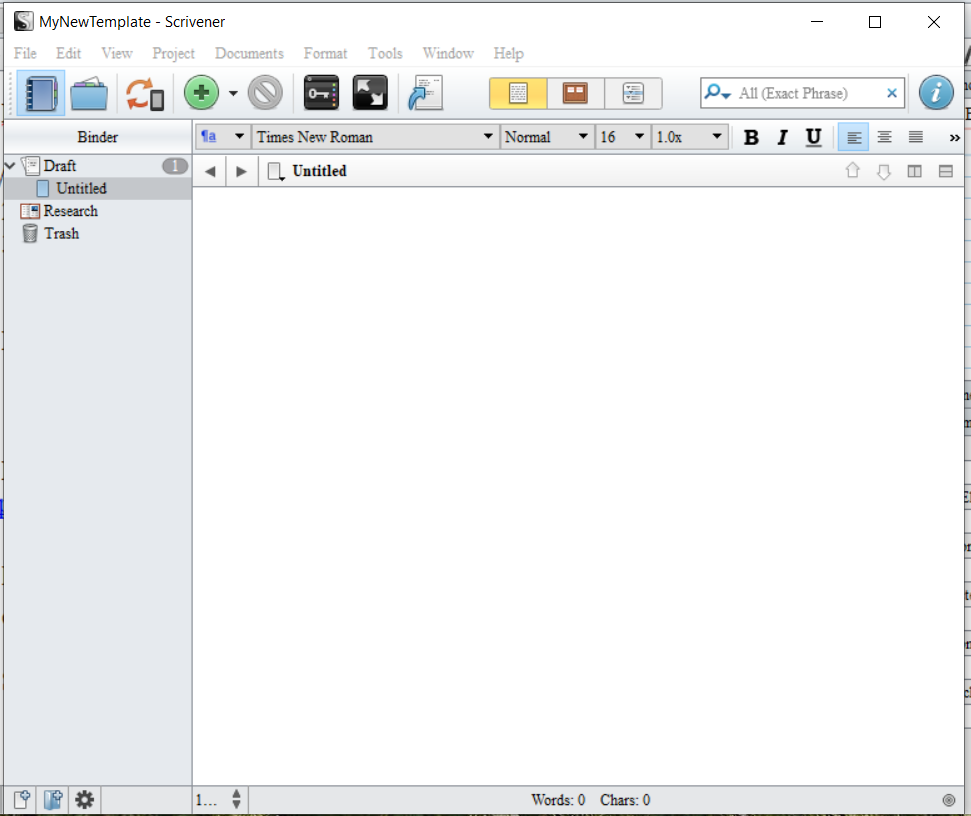
Once it opens, it will look like the graphic below.
scrivener-new-project-empty

HOW SCRIVENER FILES YOUR WORK:

For each new project you create, Scrivener creates a Folder with the name of your project.  The actual scrivener file is inside.

HOW TO USE SCRIVENER:

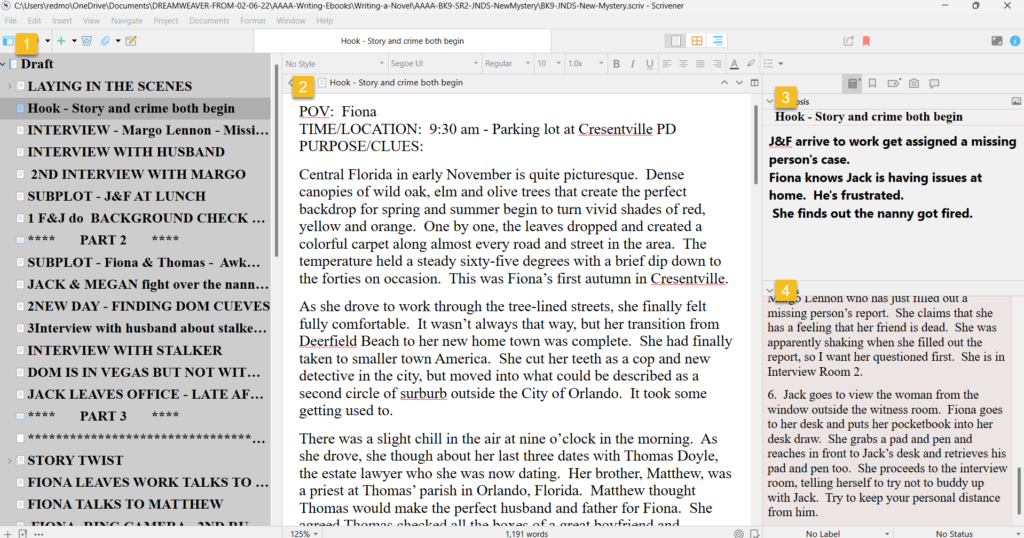
Below is a snapshot from the novel I’m presently writing.  I will identify the sections to give you an overview of how I set things up.
Scrivener-sections-one-to-four

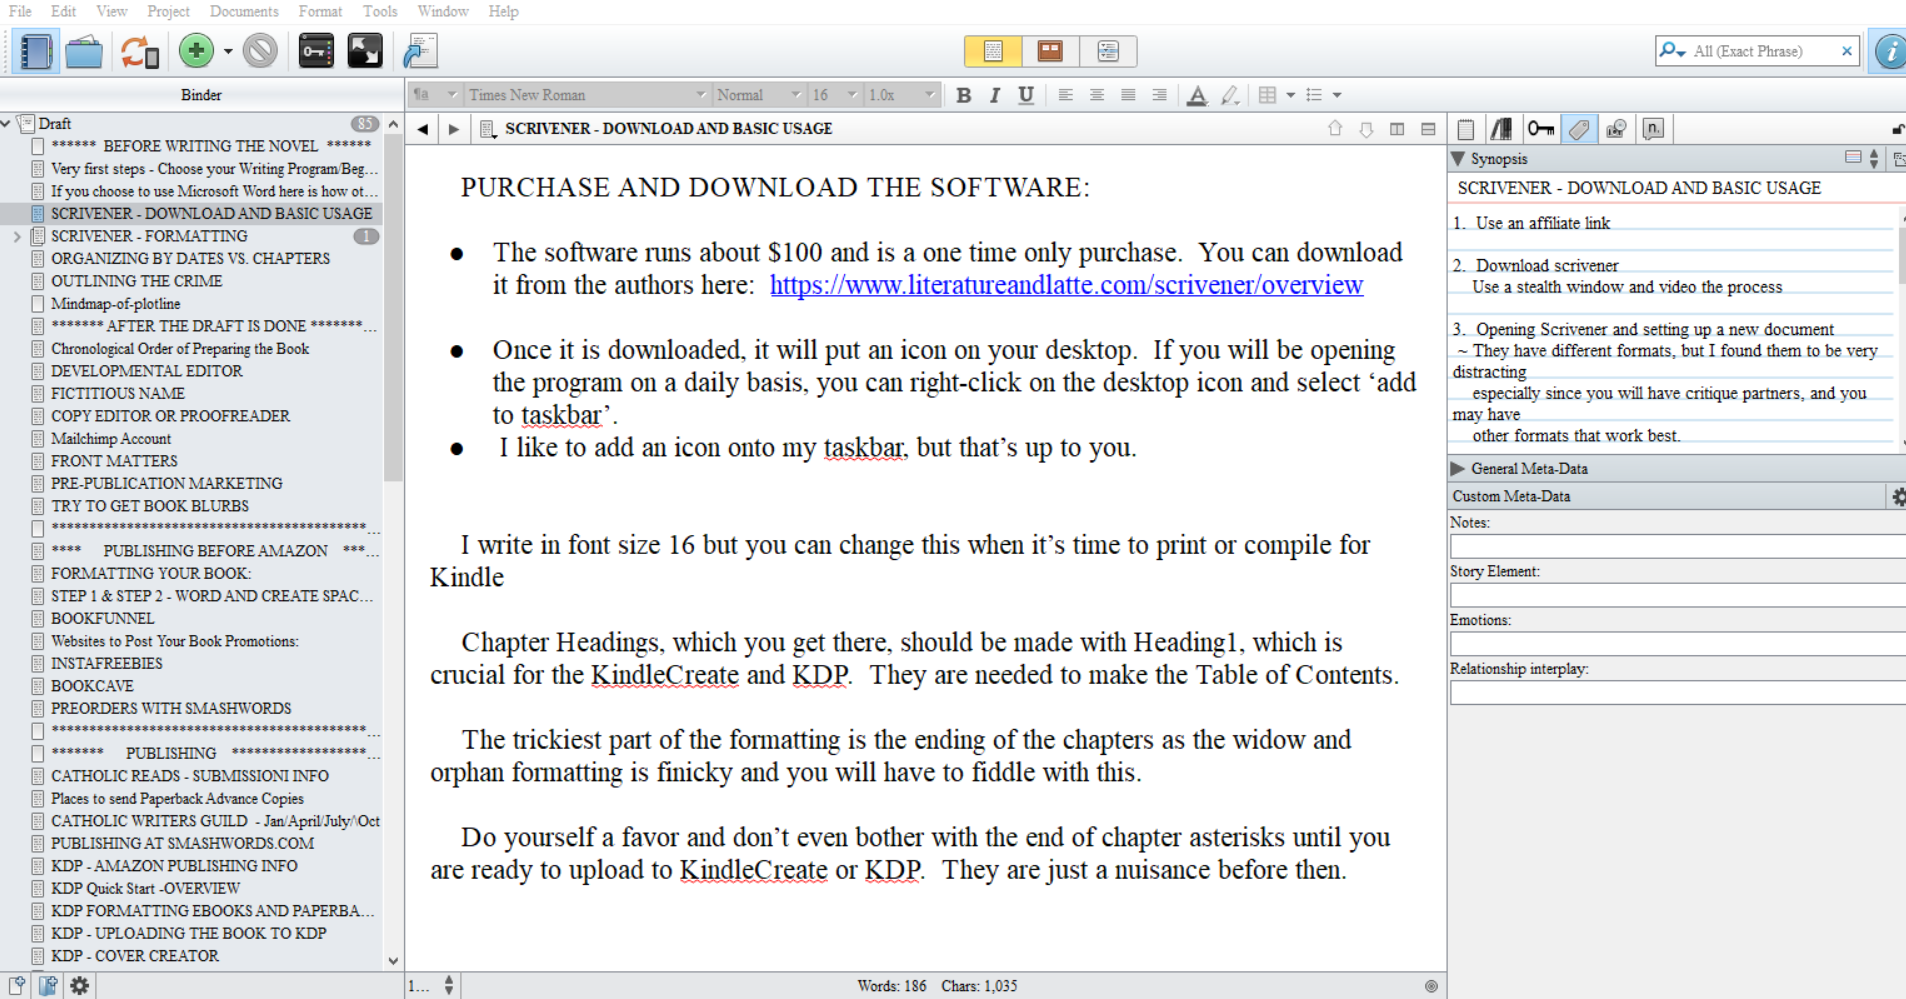
  1.  On the left hand side, each new document is a single scene.  I arrange them into Parts 1 to 4.  I follow the 4 part story structure.  In the early stages of writing, I name the scenes with a few words that will let me know what is happening.  For example:  Interview with Husband.
  2. The middle section is where the actual writing of the novel draft takes place.  Each scene begins with an outline that records the Point of View (POV), the time, location and purpose and clues dropped.
  3. Once the scene is completely drafted, I put a summary in the Synopsis section on the upper right hand side.  This allows me to know what happened in the scene in as few words as possible.
  4. The last section, on the lower right hand side is the Notes section.  Before I begin writing the draft, I copy and paste my scene outline into the Notes box so I have it in case I need to trace the roots of anything.  I usually don’t need it, but I’m leery of deleting things.

HOW TO CREATE NEW SCENE FILES:

You can either click on the green plus sign on the upper menu and choose “new file” or you can click control N and it will put in a new file under the one you are presenting in.

HOW THE SCENE EVOLVE:

Once I finish the first draft, I begin my 8 layers of writing and proofreading.  Around Layer 7 or 8, it’s time to change the names of the scenes to actual Chapter names.  I combine scenes into chapters and when I’m done, the book is now in Chapters with multiple scenes.

There’s a lot that goes on between the first draft and compiling into Microsoft Word, which is where I handle the formatting of the books.   I think as newbies, it helps to know how things evolve.

HOW TO SAVE YOUR PROJECT:

Click on File => Save As and this will throw up a dialogue box and you can choose where you want to save your project.  If you have created a Book1 Folder, then save your first Scrivener project into that folder.

NEWBIE TIP:  Be sure to choose File => Save as and not File => Save because the program will save your project to a file inside your scrivener folder or somewhere else that you may have to hunt down.

Now you have a new Scrivener Project started, named, and saved to a place where you will be able to find it!   Next we will talk about the options or properties of the project.

If you would like to see more blog posts on Writing in Scrivener, click here.

I also have a few Scrivener videos on YouTube you may like:

If you would like to download Scrivener, I would appreciate it if you used my affiliate link.  Every little bit helps me keep doing blog posts and videos.


Scrivener – Downloading the Software

HOW TO DOWNLOAD SCRIVENER SOFTWARE:

You can download a free trial of scrivener software or make your purchase here:  https://www.literatureandlatte.com/scrivener/overview

I am not sure how the actual free trial works as I knew I wanted to use Scrivener and I purchased mine from the beginning.  But I'm sure it's like any free trial where you sign up, get to take it for a test run, and then it becomes void after the free trial period.

AFFILIATE PRODUCT:

Scrivener offers an affiliate program, so if you want to sign up for it, you need to create a product for it at this website:  https://developer.paddle.com/getting-started/create-a-one-time-product.  I chose not to do this, but if you are interested, this is at least a point in the right direction.

OPENING SCRIVENER FOR THE FIRST TIME:

scrivener-new-project-pane

Open Scrivener up by double-clicking the icon after installation.  You will come to this screen where you can choose a format.  I would recommend blank because when I chose fiction, it added front matters and a lot of other things that only got me all confused.

The three icons on the right hand side are exactly as they appear.  One is an interactive tutorial that will help you get started on your first project.  The second icon is a copy of the scrivener manual that you can search for keywords for things you want to learn about.  The third icon you will recognize as a YouTube channel where they offer you training videos on how to use scrivener.

When you open a blank project, it's just that, blank.  We will set up a project in our next blog post!


Using Scrivener to Write a Novel

WHY SCRIVENER AND NOT JUST MICROSOFT WORD?

I have published a couple of craft books through the years as publishing on Amazon KDP is pretty easy.  Craft books are mostly pictures with instructions and you really don't "need" Scrivener to write a craft book.

The only organizing you need to do in a craft book is to make sure you cover all of the instructions in chronological order, have a list of supplies and take high resolution pictures and file them where you can find them during the writing of the book.

I wrote three of these books in Microsoft Word and it worked very well.  But what about fiction?

Fiction is a whole different animal.  There is no chronology in fiction.  Even in true crime, you have to decide how you will lay out the chronology of the crime attempting to create the most mystery and suspense as you can.  So this requires a high level of organization.

SCRIVENER FEATURES THAT HELP NEWBIE WRITERS:

scrivener-organizing-screenshot

After seeing my first YouTube video on the software called Scrivener, I knew this was what I needed in order to even think about writing fiction.  Looking at the layout above, on the left side, you can name your scenes first and this gives you a birds-eye view of the chronology of your story, where the story beats are, where you are in Act 1, Act 2 and Act 3.

The center pane is where you write the actual manuscript draft.

The upper section of the right-hand side is where I put my Scene Summaries using this format:

Scene 1 - POV - Character Name
TIME/LOCATION:  9am - In Character's Office/Home, etc.
PURPOSE/CLUES DROPPED:  
1.  List clues dropped
2.  List what happens in the particular scene
3.  Write down the purpose of the scene.  

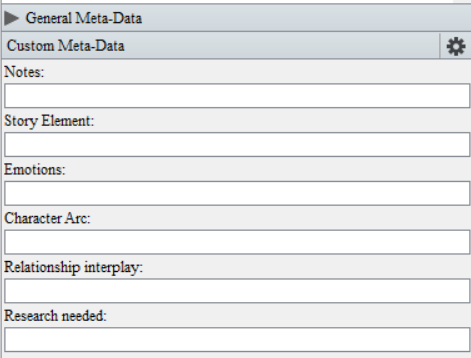
scrivener-custom-meta-dataCustom Meta Data - Scrivener allows you to set your own Custom Meta Data entries and I use the following:
~ Notes:  This one is automatic in Scrivener so I use this area for any notes I need to write to myself.

~ Story Element:  is where I put things like opening hook, or inciting incident, or first pinch point, or any other dramatic or mystery notation that is crucial to follow the story.

~ Emotions:  I added this one so that after the manuscript gets large enough, you can lose track of where the reader is emotionally, so I like to put things like mystery, or main clue, any words that will let me know that this is a sort of marker in the story.

~ Character arc:  Before beginning, I usually know where the characters will be going in their emotional or personal growth and I keep track of this arc throughout the scenes by referencing it in this section.

~ Relationship interplay:  This section I use to add the names of the characters an who is relating to who.  This way, towards the end of the first draft, I can look at the entire novel in outline format and see how often each of the characters are in the story.  This prevents you from overdoing it on some characters and making sure you don't leave anyone out.  It gives a great birds-eye-view of the story when you are finishing the first draft.

~ Research needed:  This section is where I make notes to myself about research I need to do in order to check facts or find out the legalities of something, anything I need to check.  Again, I can see everything I need to do or look up by putting the story in outline format.


Writing A Novel in Scrivener

If You Want to Write a Book but You're Stuck

confused writer pictureI speak from experience. Thinking ahead to my retirement in another three years, I began thinking about spending my time writing Christian and Catholic-friendly novels as I love to read books by other authors in his genre. I had some idea of what writing a novel would take, but never having studied writing in any detailed way, my first obstacle was where to begin. I was stuck at this spot for awhile and stayed there until I found a writing program called Scrivener.

I "thought about" writing for at least a year but the first hurdle was the biggest => Where to begin?  How to even organize my thoughts?  Should I write in Word?  I couldn't figure out how I could organize or keep track of anything.

Finally, in watching some other "new author" videos on YouTube, several of them were talking about writing in Scrivener, a relatively inexpensive writing tool that was designed specifically for writers.  After checking it out, I was sold in less than 10 minutes.

WHY DID SCRIVENER HELP ME OVER THE FIRST HURDLE?

scrivener-iconScrivener is a simple but brilliant program that is designed for writers. It allows you a birds-eye view at all times. You keep your chapters or dates on the left hand side, you write in the middle, and you can outline, add keywords, research notes, reminders, and anything else you find helps you on the right hand side.

It can also be used to help you write and organize a blog website, really anything.

SMALL LEARNING CURVE:

Scrivener is one of these programs that is very comprehensive, but there is not a HUGE learning curve as with programs like Photoshop or Premier Pro Video Software, programs like this. You can get up and running with Scrivener by watching a few ‘how to’ videos that other authors and writers are kind enough to make.

WHAT NOT TO DO:

Once I watched about 10 videos about getting started, I got lost in trying to find a template that would work for me and this turned out to be a complete waste of time. I wound up working with one folder and just text documents that during the draft phase I named by Date and time (which as a new write I am/was obsessed with) and this way, I always knew what day I was in in the story line.

I also spent too long adding a fancy chapter ending that I wound up having to do and redo I can’t tell you how many times and it wound being all for naught. Chapter endings are things you should only worry about when getting ready to publish.

DOWNLOAD SCRIVENER FREE TRIAL OR STRAIGHT OUT PURCHASE.
https://www.literatureandlatte.com/