
BRITISH MYSTERY SHOW WHERE EVERYONE IS A SUSPECT
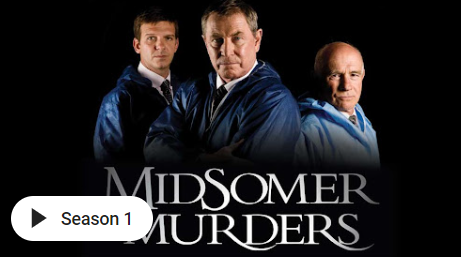 I've started watching several British Midsomer Murder Mysteries during the last two weeks while I proofread my latest novel, Where is Lucia. I love the British mysteries as they are famous for having several suspects in the story, all of whom seem guilty. And the real murderer is always a shocking surprise.
I decided to analyze one or two of the stories to see how the script writer handled the suspects and hid clues of the real culprit.
I watched this on YouTube where it's free. I'll have the show below where you can access it on YouTube if you want to watch it too.
MY PROCEDURE FOR THIS IN CASE ANYONE WANTS TO TAKE A SHOT AT DOING THE SAME WITH ANOTHER SHOW:
 I chose a murder mystery that I had already seen. I knew how it ended and I was then able to focus only my author mind on watching for clues, subtext and foreshadowing while I watched the show.
The name of the show I chose was DEATH AND DREAMS. I used my cellphone and an app called "One Note". It has a dictation feature on it. I also had a small notebook that I jotted down a few notes on so I wouldn't forget to mention in my dictation review. I paused the show and dictated my notes. When I opened my laptop, I copied and pasted them into this blog post and cleaned it up.
Many British script writers specialize in murders where everyone is a suspect and there are more than two or three suspects in each drama. And the real culprit is always a surprise.
Below is the analysis I did after watching a Midsomer Murder Show on YouTube. It's free with ads. I'll post the video below in case you want to read my analysis and see what you think.
THE OPENING SCENE VS. THE SHOW OPENING:
 This show opened with the camera walking through a common middle-income family home. A radio was playing a call in show. The woman speaking was referring to her kids being downstairs and probably laughing at her for calling the show. The announcer had the usual fake enthusiastic voice talking with her.
The camera moved slowly during two minutes of this show talk and then you saw a man sitting in a chair with his head back. His eyes were closed but it was not possible to determine if he was sleeping or dead. The camera then showed an elaborate knotting system of fish wire that was strung around to a shotgun on the other side of the room. Then you heard the explosion and the camera showed you a grizzly scene of a man blown down into a bloody mess against his stove.
The next scene was the usual opening of the Midsomer show, which is an introduction of very sweet music showing various scenes from English village life. Each scene is beautiful, cottages, ducks waddling around, beautiful weather, long windy roads, lots of trees. This opening made the last scene seem even more ghastly.
As an author, I think following up a ghastly scene with a scene of domestic life would have the same effect.
INITIAL CLUES - SUICIDE:
 The next scene shows Det. Barnaby and Sgt. Troy show up and discuss what they see. Troy draws a conclusion that it has to be suicide. Det. Barnaby is not so sure. He wonders why the guy didn't just go outside and shoot himself; why the elaborate fish-wire setup.
Barnaby notices a silver trophy that is present on the table. He smells what's inside and he also sees a bottle of wine present in the kitchen. They mention that the housekeeper is the one who found him.
INTERVIEW WITH THE HOUSEKEEPER:
The housekeeper, Mary May, confirms she found him when she showed up at 8:30. Her affect is off, however. This is one way the writer cast some doubt about her. She was too contained, too reserved in her reaction with the cops.
She goes on to say that she and others may have seen this coming. Mr. Martin Roth was a mean man. He hadn't paid her for 4 weeks before he died. She went on to say he owed a lot of people money. She also said a lot of people didn't like him. This too creates the possibility that maybe someone else wanted to murder Mr. Roth.
NOTIFICATION OF THE ESTRANGED WIFE:
Barnaby and Troy go to notify his next of kin which is his estranged wife, Sarah Roth. She says he was a miserable drunk, gambler and cheater and also physically abused her. She is shocked however when they say her husband killed himself. She is now living with another guy, Gordon, who is a part time chemist/pharmacist and local musician who leads a small town marching band. They have a small baby that she is taking care of.
The wife does show some guilt when she says she hopes it wasn't over her. It comes out that her husband wanted her back and he kept coming over when he was drunk and shouting things at her from outside. When Barnaby is there, he sees similar trophies to what he found at the murder scene. Silver cups. This casts suspicion on the wife or her new boyfriend. Her ex made all kinds of trouble for her and her new husband who were set to be married as soon as the divorce went through. This, of course, could be a motive as well.
Somewhere in the beginning Barnaby gets a report that Mr. Roth was on a large amount of Tenzine and this is an antidepressant but it would have rendered him incapable of pulling the trigger. He was killed first and then blown apart. The cops know it's murder not suicide.
THE CHEMIST FINDS OUT:
In the next scene, Mary May, the housecleaner, runs into the pharmacy and tells Gordon -- Sarah's Baby Daddy -- that she found Martin Roth shot dead. He almost rudely escorts her out of his shop without explanation. It makes you wonder if she is just a gossiping troublemaker.
BARNABY'S OLD COLLEAGUE FROM MERCY PARK ENTERS THE STORY:
 Next we find out that Martin Roth was receiving psychological treatment at a local psych hospital that was run by his old pal, Dr. Jane Moore. Jane runs the institution and is widowed now. Her husband died on a climbing expedition a few months earlier. She is now taking care of her three step children, two of whom witnessed their father's death, but they all appear to be a happy family.
Dr. Moore is referred to as a psychological profiler and she worked a case with Barnaby in the past. He has great respect for her, but Troy resents a chumminess that exists between them -- probably because Barnaby is a married man.
Dr. Moore is shocked to hear her ex-patient killed himself. She admits she used to go there and check in on him. You get the impression it may have been friendship or she is just being a good doctor.
THE DOCTOR'S FIRST PARTY - THE ANNIVERSARY:
 Dr. Moore has a party to celebrate her hospital being open for a year. Barnaby brings his wife and Toby comes with Barnaby's daughter, I think her name is Cilly. This is where the young resident says he would do anything for the doctor and the two daughters are standing next to him. They roll their eyes at him and the younger one giggles at him. They think he's a fool.
Troy still doesn't like the closeness between his boss and Dr. Moore. He decides to leave with Cilly and he wants to go to the obstacle course at the hospital and climb the elaborate rope climbing.
Cilly sees movement in the bushes, but she dismisses it because it was only a second. The viewers know there's someone in the bushes. Troy tries to climb but he's a little tipsy from drinking and he falls down onto the ground and laughs. Cilly says, I'll show you how it's done. She climbs up with no trouble and as she comes to the top, she looks up and the young resident is dead and hanging from a hangman's rope. Cilly tells her father the next day at lunch about seeing the bushes move and thinking someone else was there but she can't be sure.
The medical examiner says that this victim was drowned in the creek behind the climbing equipment and dead first before he was strung up. They also found Tetrine in his pocket, the same pills that Martin Roth had taken. It's starting to look like maybe it was the resident who was the murderer.
THE DRUM MAJORETTE OUTFIT HAS ARRIVED:
 Now, in the next scene, the chemist is on the phone and he's whispering to someone that a little something has come in the mail and maybe you'd like to come and see me sometime. You hear his baby in the background which makes him seem even more sleezy.
DR. MOORE STICKS UP FOR HER RESIDENT:
The two cops are in the hospital looking through a bunch of stuff. Troy tells the doctor that the resident had Tetrine pills in his pocket and she replied that he probably had them to give to the patients. Troy asked here, why did he bring them to the party. You can tell there's a little tension between the doctor and Troy.
Then the older cop shows the doctor that there's a letter he found. He's holding a letter about Dean Honeysette, stating that in light of his recent behavior, he recommends that all of his privileges are suspended. Being a gardener off premises is a big privilege. It was signed by the resident. This makes the viewer believe that this would be a reason for Dean to kill the resident, to protect his privileges.
THE COPS TALK TO DEAN AT THE HOSPITAL:
 The cops find Dean in the hospital and he's very guarded and uncooperative -- also still pretty weird too. And they asked him where he was last night when the resident was killed and he claims he has an alibi. He was in the wing of the hospital and there are 4 people who saw him. It was lights out at 9:30 and he claims he was in bed.
They ask him about his criminal record and it comes out that he was a car thief but he did resort to strangling someone then.
Dean tells the cops that he didn't kill the first guy and he said he didn't kill the second guy (the resident), but he thinks the second guy who died was weak. He said this place needs strong people like him and Dr. Moore. He claims that people look up to him and feel that he has been through everything and is still okay.
Dean also tells them that he told the doctor not to put the obstacle/exercise course along the river creek in the back, but the rope guy insisted that's where it should go. He knew it was going to be trouble.
THE COPS GO SEE THE ROPE GUY:
As the cops pull up to see the Rope guy, he is acting weird and says that he loves rope, the feel of it. He asks the cop to smell the rope and reveals it's the best rope in the world. It's from the middle east somewhere.
He goes on to tell them that his family before him were Rope Guys. He had a distant relative who was a hangman. He says this with pride. He comes off like a nutball and he could easily be the culprit. It also comes out that Martin Roth also owed him money. They were supposed to go into business together. He shows the cops a stand that has a few handmade toys or some kind on it. That was the money Roth never gave him.
THE CLOTHESLINES BEGIN TO DISAPPEAR:
 Then in the next scene, with no explanation to the viewer, you see a woman taking clothing off of a clothesline, an innocent domestic scene. She has her children in the yard with her. After she leaves, someone off camera comes up and cuts the clothesline at both ends and takes the rope away. No explanation.
MEET THE BABYSITTER:
The cops both go to talk to Gordon the chemist and Sarah his wife but they are out. The Doctor's daughter, Hannah, is babysitting. She gives him a cup of tea and they make pleasant conversation. She tells him she's nervous about what's happening all around them in the village. He tells her not to worry, they are on the case. She tells him she wishes they could all move away from there and go someplace where they could all take care of their mother. She asks Barnaby if he will be going to her mother's second event -- the second party. I can't remember what the occasion is, but it's the second party the doctor has at her place. Barnaby says, oh yes. Barnaby asks Hannah if she likes the marching band music. She says, oh, no, it's so silly with those outfits they wear. She rolls her eyes. She has no interest in it.
DR. MOORE'S SECOND PARTY:
 They go tot he party but this one is set up like a little town bizarre or carnival. Gordon and his band are all dressed up in their uniforms and they are playing music at the affair.
In the background, the rope guy is present and acting generally weird, but nothing relevant, just weirdo stuff, looking mean and dastardly as he was playing one of the carnival games.
Dean is also there and he is wearing his Nazi look and demeanor. He's eating something and just pushing it into his mouth like a complete nut ball.
Mary Mays husband is a referee and he is organizing them into a tug of war. On one side is Dean the weirdo and his bunch of other guys. On the other side is The Rope Guy and his bunch of other guys. As Mary's husband counts down, the guys begin to pull before he says go and they all wind up falling down. The ref begins to scold them and Dean comes up and starts strangling him. The cops come and wrestle them apart.
Just at that moment, Mary Mays shows up and says what's going on here? And she reports on a terrible crime that just occurred at her house. They go and her clothesline has been put down. Hers and her neighbors. She left the crime scene alone, in other words, the clothing was still on the ground. Troy is about ready to roll his eyes when she refers to it as a crime scene.
Troy also tells Barnaby that he should arrest Dean because he's dangerous and he had the motive and means to be the killer of all of of them. Barnaby doesn't want to act yet. Troy thinks he is allowing his feeling for the doctor to get in the way.
THE CHEMIST GOES ON HIS SECRET RONDEVOUS:
The camera shows Gordon put son a new uniform he bought, adjusts his hat, opens the door and says, "I'm glad you were able to come". Viewer can't see who is at the door. Scene ends.
ANOTHER ROPE CUTTING:
Mary May's husband throws the garbage out from his business on Main Street. He looks across the street and someone has cut the rope that was holding his English flag up and it's now laying on the ground. He's outraged and like his wife, he considers this a serious crime and call the cops.
As Troy is dealing with Mary's husband, he looks over and sees Sarah with her baby in a carriage knocking on the pharmacy door calling out her husband's name. Troy goes over and finds out Gordon never came home last night.
Two musicians show up to the music room for practice and knock, but no one answers. They think it's odd, but wait. Then they go in and see Gordon has been hung from the back of the door in the music room. He's dead.
When Barnaby and Troy show up, they see scuffle marks and they believe that he too was killed first, and then strung up. It's all about the rope. His wallet and valuables were still present. It wasn't a robbery. They notice a package wrapping that is left on a couch. They trace it and find out it was for a majorette's outfit.
MORE CLOTHESLINES:
There is another inexplicable scene where you see a farmer riding on his tractor. Off to the side he sees something. The camera shows rows and rows of clotheslines that are holding some kind of brownish muslim sacks. There's no explanation. In the midst of these sack is a the new Major music jacket Gordon bought for himself. The scene ends without any real explanation.
DR. MOORE IS AGAIN HORRIFIED:
The cops go and tell Dr. Moore and she says it's horrible. She comments that he was harmless. She can't fathom why anyone would kill him. She tells them she has to show them something. She brings them into the back of the hospital and all the ropes have been removed from the obstacle/exercise course.
THE COPS VISIT THE ROPE GUY AGAIN:
 The two cops go to visit the rope guy and when they arrive, he is walking out of his business. He tells them he was about to come and see them. He shows them that he has been cleaned out. Every rope he owned is gone. All of it. He only left to get something to eat, he couldn't have been gone fore more than an hour or so.
BARNABY MEETS WITH SARAH:
Troy still thinks the killer is Dean. Barnaby is still investigating. He goes to see Sarah Roth, the Chemists grieving girlfriend. She is upset about losing Gordon. Barnaby asks her if she ever noticed the trophy missing. She said, no, she didn't. He asks if her husband every told her it was missing. She said no. Barnaby asks if maybe Hannah the babysitter could have taken it. Sarah scoffs and says, no, she would never do anything like that.
Barnaby asks her if she knows anything about her husband getting a drum majorette's outfit. She said, no, he didn't mention it, but she knew he wanted to get majorettes for his band, but she told him she thought the village was too conservative for that. She wasn't alarmed at all by his behavior. Sarah tells Barnaby that Gordon thought her ex-husband took the trophy and that could be because he was always hanging around, watching them, and starting trouble.
BARNABY CHECKS OUT THE FARM WITH ALL THE CLOTHESLINES:
Next scene is Barnaby going to talk to the farmer and there is a cricket game or some other English sport going on with the doctor's step son. The two girls, Hannah and her younger sister are sitting on a blanket with food and tea. They give Barnaby a tea.
The younger sister gets weird and asks Barnaby if he's ever been on a picnic with their mom. He says no, and she says, I bet you would like to. Her sister tells her to be quiet. Barnaby takes it all in. He takes the musician's coat that was hanging on the clothes line and he goes into his car. He puts his head back and closes his eyes like he wanted to take a nap.
When he wakes up, it's dark outside. He looks around and he sees some kind of movement over by the clotheslines. He gets out and goes over to see what is going on. Someone throws a rope around his neck and begins to strangle him.
Just in the nick of time, Troy pulls up and beeps his horn. Whoever was strangling Barnaby is thrown to the ground. He is taken to Dr. Moore's house and given some whiskey or something to settle him down. Her kids are all there with her. Barnaby is nursed back into shape by Dr. Moore and her kids.
THE COPS GO LOOKING FOR DEAN:
After this, the two cops go looking for Dean. He hasn't returned to the hospital. They find all kinds of rope in his closet. Then they go back on the grounds to another area that he used to work in. They open up a shed and there's more rope inside there too.
Dean shows up and tells them that he saw Troy and his girlfriend in the yard that night. He was ready to cut the doctor down, but they showed up. (This resolves who was in the bushes when Cilly saw them moving).
He then says that he had to remove all the ropes so the killing would stop. It was the only thing that would stop the killing. Barnaby asks him how many are we talking about? He doesn't answer. He then refuses to talk.
BARNABY FIGURES IT OUT ON HIS OWN:
 In the next scene, a white van pulls up and the school kids get off. Dr. Moore's kids are on the bus. They are then taken into custody and separated for questioning. Barnaby starts with the older sister.
She is snotty and scoffing and basically unresponsive for awhile until she figures out they have evidence on her. She finally comes clean and admits that they killed everyone and she ends by saying "no one will ever take our mother from us."
THEN THE REAL PSYCHO ENTERS THE SCENE:
 The next scene is when the younger girl comes in for questioning. She asks where her mother is. There is a guardian there for her but not her mother. At first she just looks nervous.
Barnaby asks her a few preliminary questions and she is a little more cooperative than the sister. He asks her if she loved her dad and she said yes but goes on to admit she loves her mother more. Barnaby asks her if her brother and sister witnessed their father's death. She giggles and whispers to him that he didn't fall from the cliff, her brother and sister pushed him. She giggles and giggles. She's weirder than all three previous weirdos in the show. The actress playing the sister had spaces between her teeth and this made her seem crazier and more psycho when she giggled.
THE LAST SCENE - BARNABY IS REALLY A GOOD HUSBAND:
In the last scene, the older cops wife pulls up in her car and she seems like she doesn't know what's going on. She asks him why have you asked me to come here? He tells her I may need you for this. They stand together as a couple as Dr. Moore meets them.
The show ends by Barnaby putting his arm around Dr. Moore's shoulder and walking with her and his wife into her hospital. He is telling her that her kids are all psychos and they were the ones who killed all the people.
The only thing that was left out of this narration, to the best of my knowledge, is that when Hannah and Barnaby were talking, it showed Hannah pulling the fish wire to fire the gun. It also showed all three kids holding the Resident underwater to drown him. They also showed the brother strangling Gordon while the two girls taunted him by mimicking drum majorettes.
WHAT I LEARNED AS AN AUTHOR:
I found it surprising that they had about three scenes where nothing happens except characters act mean and crazy. Like other viewers, I didn't think twice about it as I watched the show the first time. I just thought these guys looked guilty or crazy and could be a suspect.
Secondly I learned that there was very little if any foreshadowing about the sisters during the entire show. Aside from their connection to the head of the hospital, there was no real connection to them until almost the end when it was time to wrap up the 1.5 hour murder show. I didn't think anything of this when I watched the first time which means the author got away with it!
Thirdly, I learned that bookending grewsome scenes in between two sweet domestic scenes makes the horror worse somehow. This is an important takeaway.
Fourthly, I learned that you don't always have to offer a reason right away for a character acting weirdly. It's okay to have some scenes where something strange happens with no explanation until later on.
Next I learned that there was no mention of the absurdity of having this serial killer on the loose in a small village in England and there's no press around and people seem to just take it in their stride. In the same way that a person agrees to suspend belief in a horror or science fiction movie, they will also suspend belief about the level of murder for the sake of a good murder mystery.
I also noted that the two sisters were not weird at all during the entire show, but in the last scene, for the sake of a little horror, the writer made the girls quite ruthless and horrible. To me, this also relies on the reader/viewer agreeing to suspend belief for the sake of a good mystery.
WHAT DO YOU THINK?
If you would like to discuss this show, email me at rshannon at readfirstchapter dot com.
 Each writer or author will have slightly different goals. My blog post will speak directly to website bloggers and/or to fiction authors. However, if you publish low-content books or children’s books — or even coloring books, all of these techniques will be relevant to you because they are about basic marketing. Just change up whatever technique is mentioned and make it more fitting to whatever type of marketing you need to do.

 START COLLECTING EMAILS: Collecting emails to send to people about your book or books. I would recommend MailerLite as they are the least expensive but professional platform for a beginner. Everyone starts with a free account. They allow you to collect a couple of hundred emails before they want to get paid. And then they charge you per hundred or so. So your expenses keep steady with your marketing results.
 GOODREADS: Establish a presence on GoodReads.com where the most avid and voracious readers hang out. Sign up for an account with them and you will get a chance to upload your book cover. It can be a little confusing at
 I personally am too shy (and too old) to go this route, but if you happen to be a bit younger or extroverted, this can create a HUGE BUZZ. Local people become fans, they tell people they know you, they buy paperbacks and hardcovers — and many want you to sign them! So don’t underestimate the life of the buzz you can create by talking about your book in front of a few people at the local library.
 LOW-BID AMAZON AD STRATEGY: And the last step for absolute beginners is to learn strategies for low-bid strategies (going for the low-hanging fruit) using Amazon Ads. This is where you bit .12 cents a click. You won’t rocket to the top of the best seller list, but this is a great strategy to begin to crawl your way out of oblivion. I’ll have a dedicated blog post about how to set up a low-bit strategy.
 I personally don’t like social media — the whole thing. However, I also don’t really like marketing either! But in today’s world, if you want to self publish, you need to market your books or blog and there are lots of ways to market even if you are shy or introverted, like I am.
 First: It’s only a plan of action if you do something about it all. So be sure to open your social media accounts in the next days if you haven’t established them already.

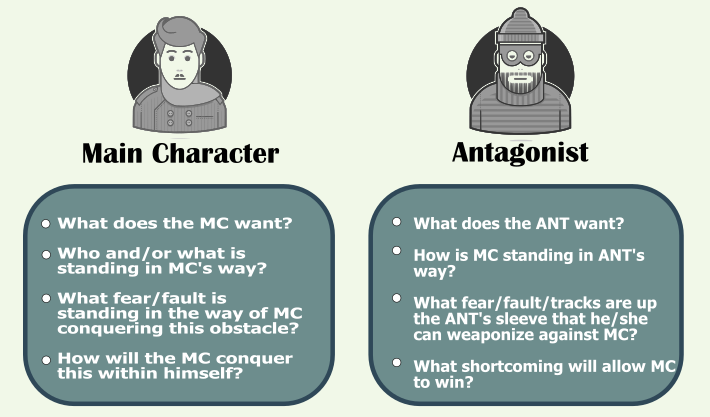
 I use a four-part plot structure, so I break my character arc into four sections. This allows me to keep up with the character development and also don’t resolve the inner conflict too early.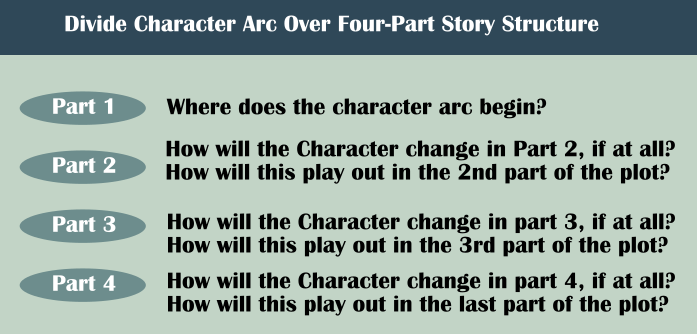

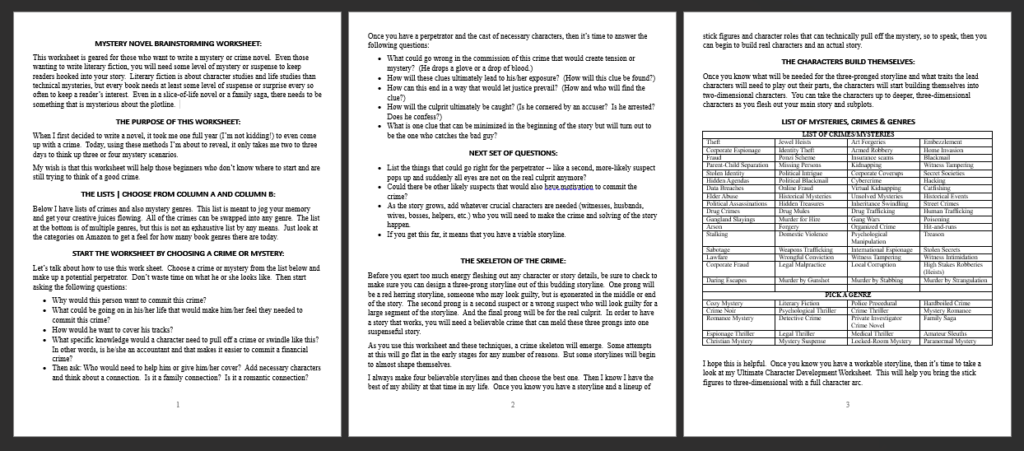

 If you are stumped for a main story, or if you are stumped for what happens now, or even if you have written yourself into a bit of a corner, this instructional will help, along with your own creativity and thinking, to bring about new possibilities.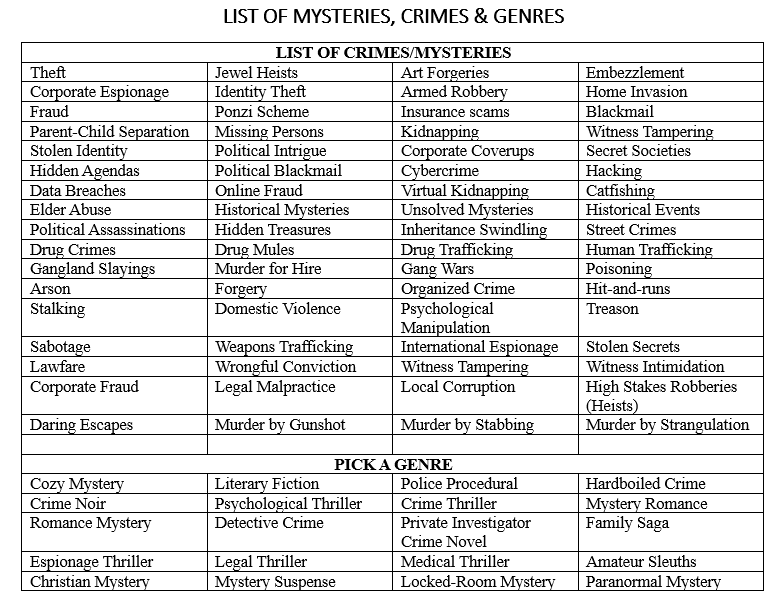

 Once you have a perpetrator and the cast of necessary characters, then it’s time to answer the following questions: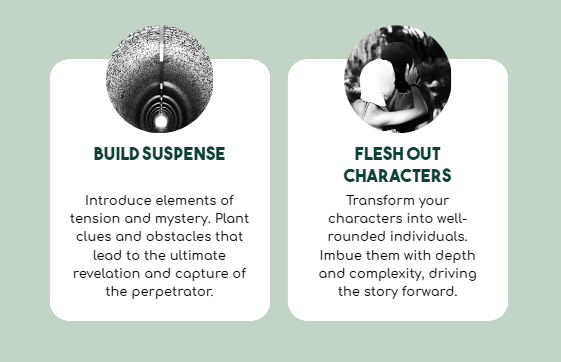
 Before you exert too much energy fleshing out any character or story details, be sure to check to make sure you can design a three-prong storyline out of this budding storyline. One prong will be a red herring storyline, someone who may look guilty, but is exonerated in the middle or end of the story. The second prong is a second suspect or a wrong suspect who will look guilty for a large segment of the storyline. And the final prong will be for the real culprit. In order to have a story that works, you will need a believable crime that can meld these three prongs into one suspenseful story.
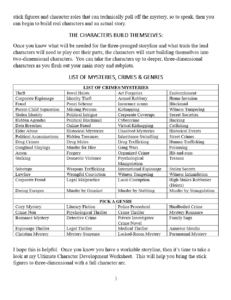 As you use this worksheet and these techniques, a crime skeleton will emerge. Some attempts at this will go flat in the early stages for any number of reasons. But some storylines will begin to almost shape themselves.
 Pulp Fiction become popular during the depression of the 1920s and 1930s. Publishers at the time used a very cheap “pulp” paper in order to produce these short stories and magazines that cost about a quarter. Yes, twenty-five cents!

 This book is for beginners who are publishing their first or second novel and they are still a little skittish about what else goes into a book. I’ll lay it out so you can easily follow the list and be confident that you’re not forgetting anything. These page suggestions are taken from the publishing industry. These are the pages that appear in a book published by a publishing house.
 When I self-published my first novel, I finished it and uploaded it and waited. That’s when I learned how important marketing the book is. I also learned through the next several books how important it is to take advantage of each tiny phase of a book launch for marketing. That’s what this blog post is about.


 Writing a novel is a huge undertaking. There are many things that go into the writing of a fiction story. The best tip I can pass on is this: Break everything down into little bite-sized pieces. By doing this, you can reduce a huge project down to do-able portions that can be done whether you have 2 hours a week to write or two full days! It only requires a little planning and organization.
 It’s important to keep reading as your own journey as a writer continues. Each author has a different style and uses different storytelling techniques. The stories don’t even have to be great. You can learn from the good, the bad and the bland. Just analyzing what made a book bland is a great lesson in itself. Did the story need more action? Did the story get stuck somewhere?
  or other books you read. Reading other authors is crucial no matter where you are on the writing spectrum. However, when you’re new, you can learn a lot from watching mystery or crime noir movies. I like movies from the 1940s, 1950s, and 1960s. The movies in these decades didn’t have CGI and the directors had to use the stage to tell the story. They used wider shots and props to assist the storytelling. By watching these older movies, you can learn a lot regarding writing.
  It’s a good idea to read the synopsis before you view the movie. Knowing at least a basic outline of the story will allow you to absorb more as an author. If you go into the movie blindly, you will be “experiencing the movie” as a viewer only. By knowing ahead of time what story will be unfolding, it will allow you to watch specifically for certain scenes to unfold. You can watch what tools are used to move the story along.
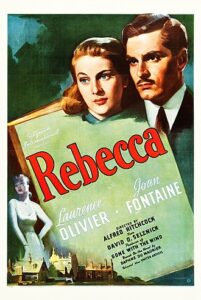 If you are looking for a suggestion, I would suggest Rebecca for the first movie. This movie was directed by Alfred Hitchcock and it has a lot of gothic atmosphere. There is also a psychological plotline in this story so it is a goldmine for learning storytelling tools.